
If you've been tasked with building a SharePoint intranet and aren't sure where to start, you're not alone.
Maybe someone said, “We need a new intranet. Can you build it in SharePoint?” And suddenly you're staring at SharePoint wondering what should go on the homepage, which web parts to use, and how all of this is supposed to fit together.
In this step-by-step guide, you'll learn how to build a SharePoint intranet from scratch using 100% out-of-the-box (OOTB) SharePoint features, no coding or third-party web parts required.
By the end, you'll have a working intranet with a homepage, navigation, company news, employee resources, department content, events, and useful links.
Looking for inspiration?
See real SharePoint intranet examples and homepage designs before you start building.
Table of Contents
What Is a SharePoint Intranet?
Before You Build: Plan Your SharePoint Intranet
How to Create a SharePoint Intranet in 7 Steps
What Can You Build with Out-of-the-Box SharePoint?
When Is Out-of-the-Box SharePoint Not Enough?
SharePoint Intranet Design Best Practices
What Is a SharePoint Intranet?
Before we start building, let’s quickly cover what we’re actually creating.
A SharePoint intranet is an internal website where employees can find the information, tools, and resources they need to do their jobs.
For many organizations, SharePoint is a natural choice because they’re already using Microsoft 365. Your intranet can live within the same ecosystem as Microsoft Teams, OneDrive, Outlook, Entra ID, and other Microsoft 365 services employees already use every day.
So what does a SharePoint intranet actually look like?
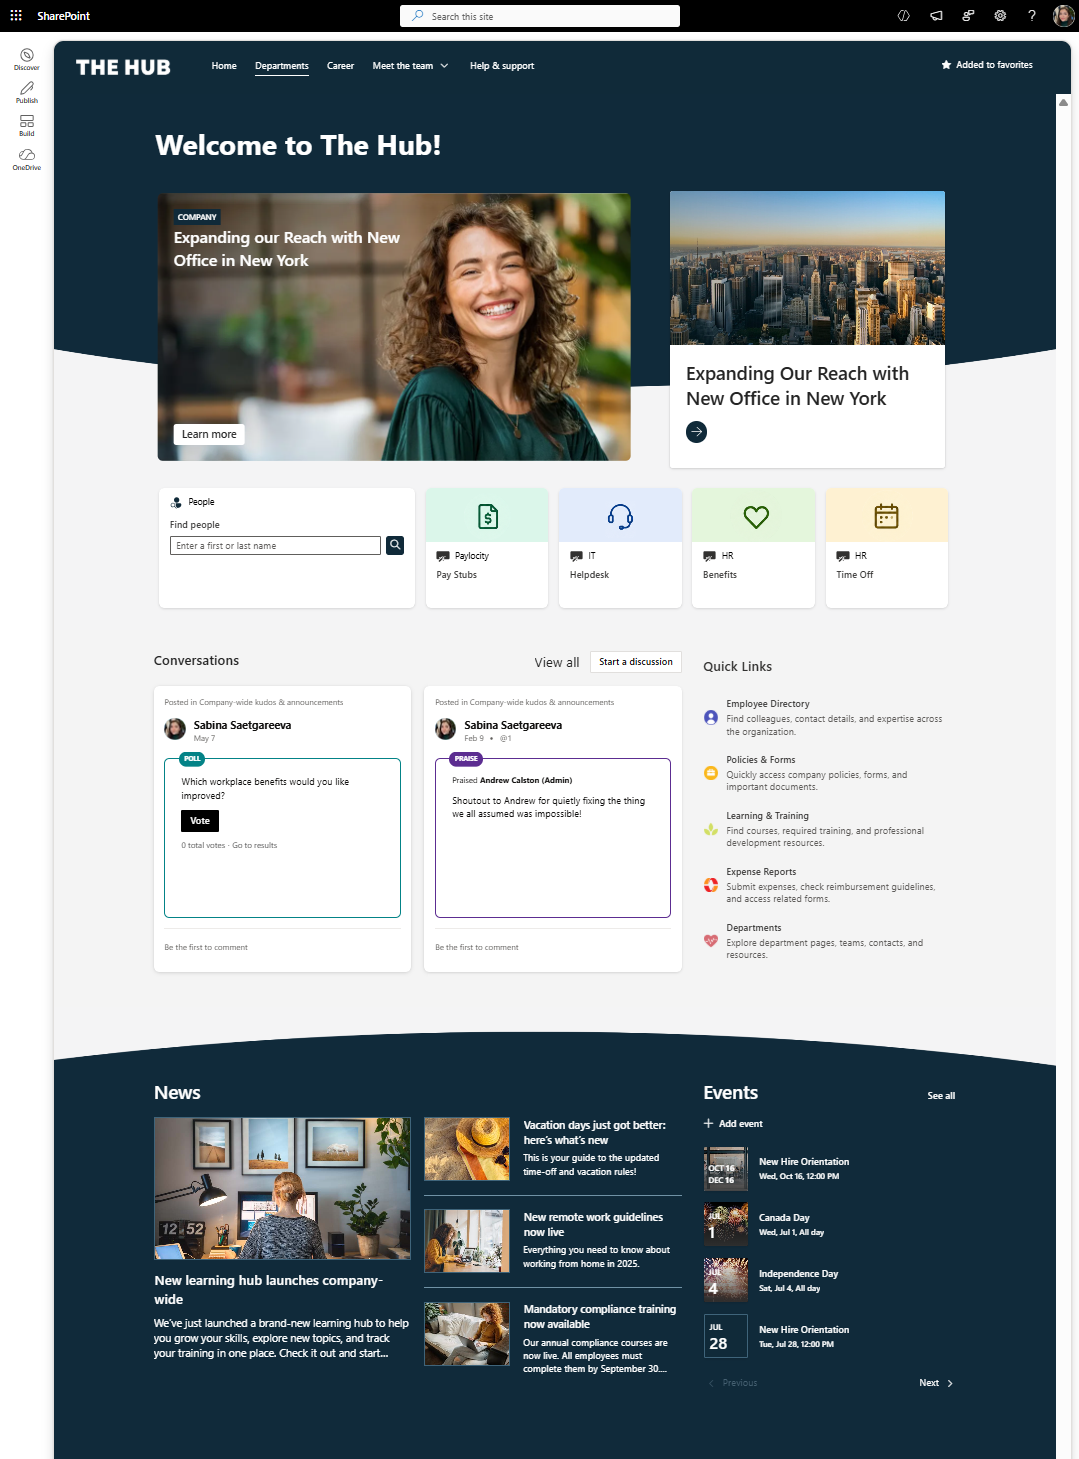
It usually starts with a company intranet homepage that brings together news, employee resources, events, and frequently used links. Here’s the SharePoint intranet homepage we’ll build in this guide:
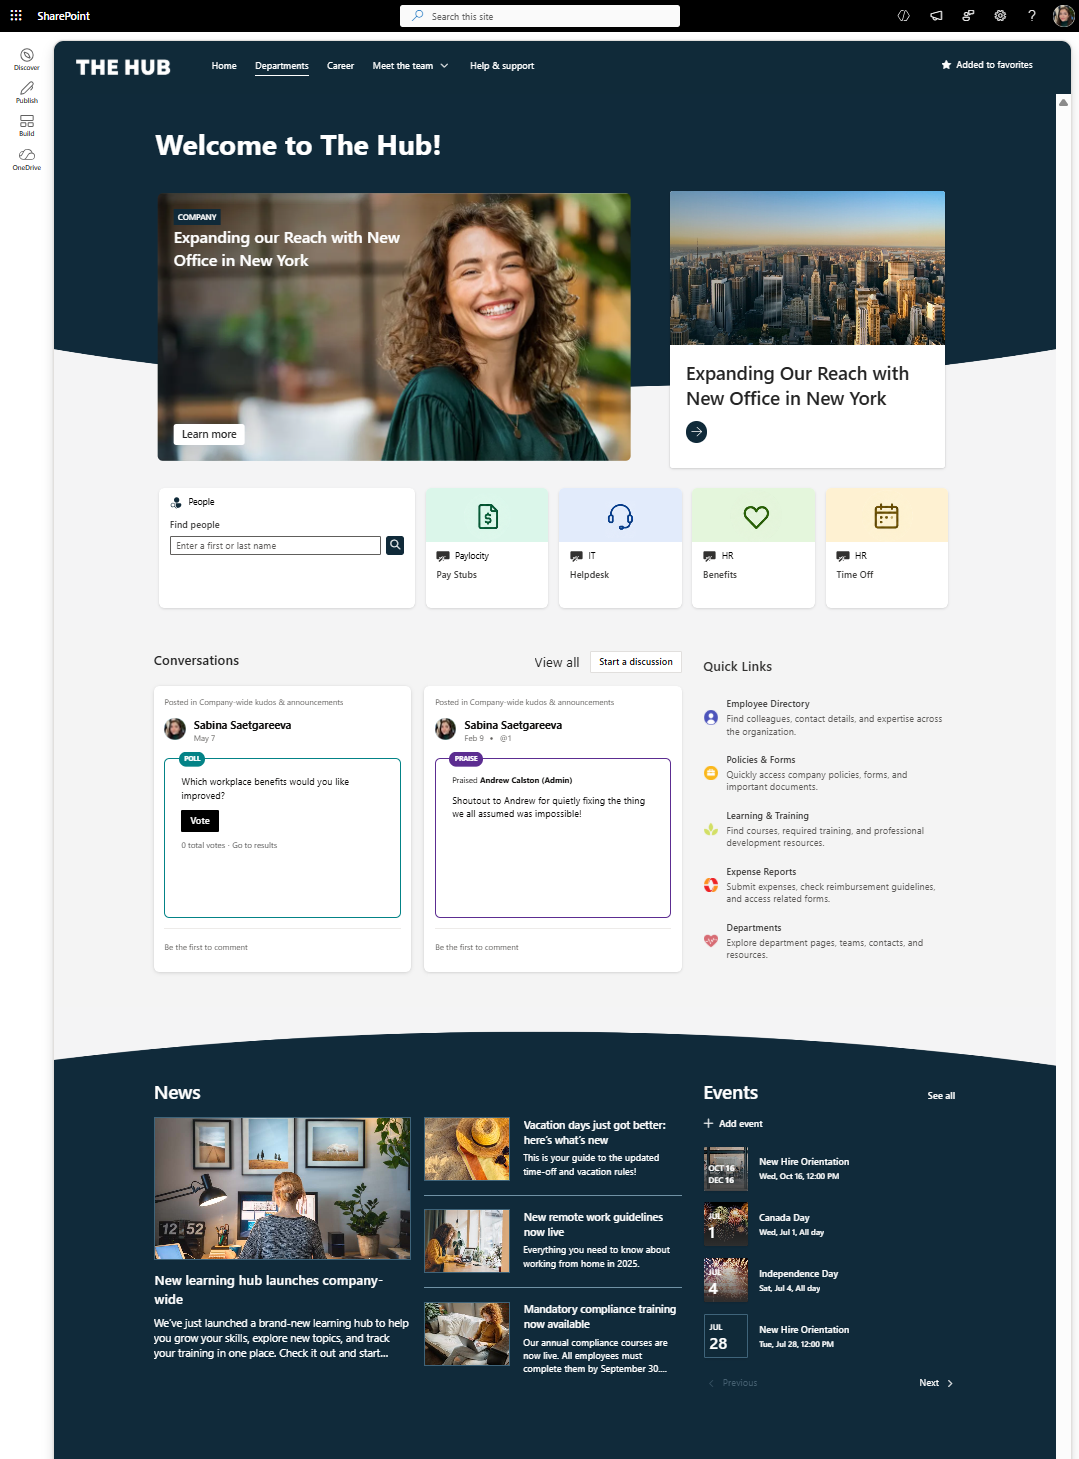
Example of an out-of-the-box SharePoint intranet homepage
But here's the important part: adding a bunch of pages and web parts doesn't automatically make a good intranet.
Before you build anything, you need to know what employees actually come there to find and do.
And that's where we're going next.
How to Plan Your SharePoint Intranet
Before you build a SharePoint intranet, don't make this mistake.
Don't open SharePoint, look through the web parts, and start adding whatever looks useful.
That's how you end up with a bunch of web parts but not necessarily an intranet employees actually need.
Instead, start with this question:
What are employees coming to the intranet to do?
Maybe it's checking benefits, submitting an expense, finding a policy, contacting IT, finding a coworker, or catching up on company news.
Write those tasks down and group them into a few key areas.
Then ask one more question:
Who owns each area?
HR might own benefits, IT owns technology resources, and Internal Comms owns company news.
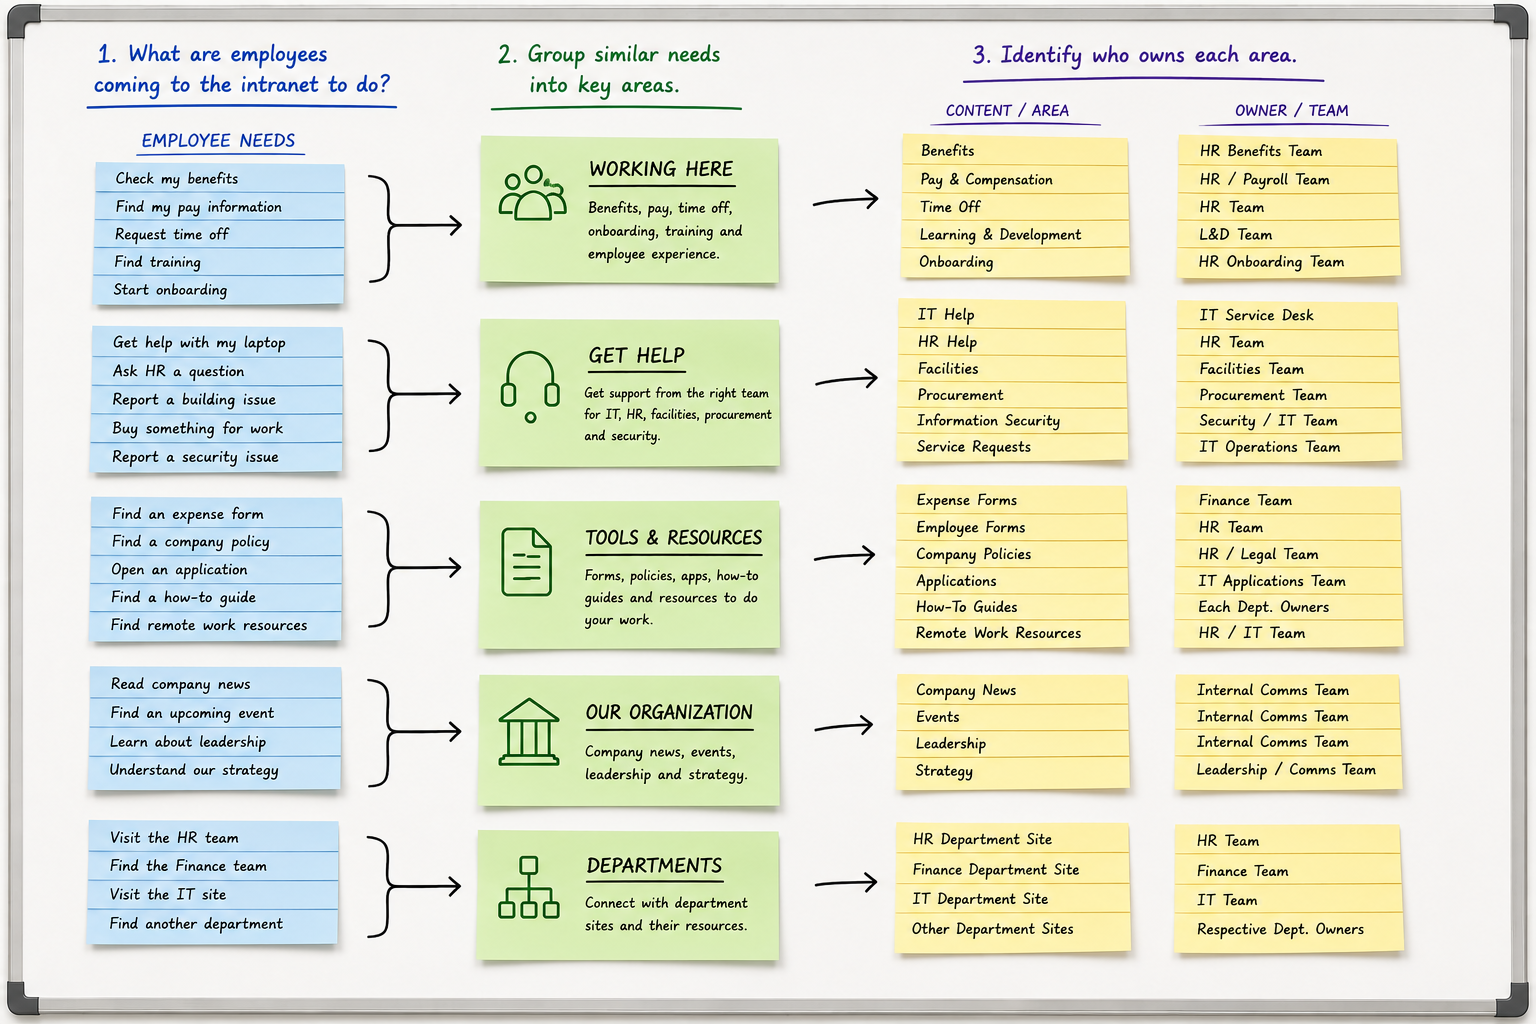
Plan your SharePoint intranet by grouping employee needs into key content areas and assigning an owner to each.
Here's the rule:
Don't build an intranet area unless employees need it and someone is responsible for keeping it current.
Do this exercise first and building the actual SharePoint intranet gets a whole lot easier!
Want to see a few more page ideas before we start building?
Browse our SharePoint design ideas below for inspiration on different homepage designs and intranet layouts.
Once you have a list similar to above, its time to start building.
How to Create a SharePoint Intranet in 7 Steps
Step 1: Create a SharePoint Communication Site
Let's create our intranet.
From Microsoft 365, open SharePoint → Build→ Site.
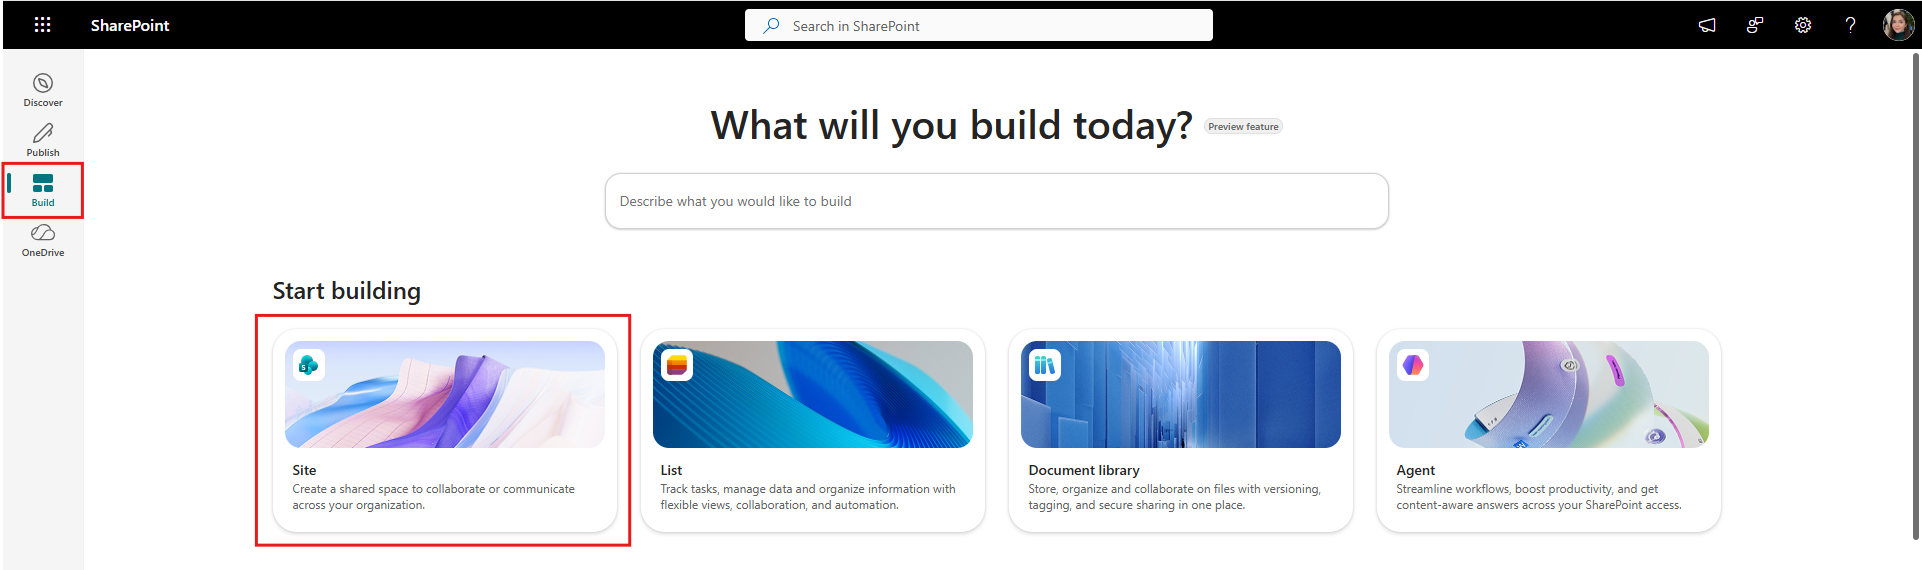
Start by creating a new SharePoint site
Now you'll get an important choice: Team Site or Communication Site?
A Team Site is built for smaller groups collaborating on documents and projects.
A Communication Site is built to publish information to a much larger audience. A few people create the content, while everyone else consumes it.
For our intranet we need a Communication Site.
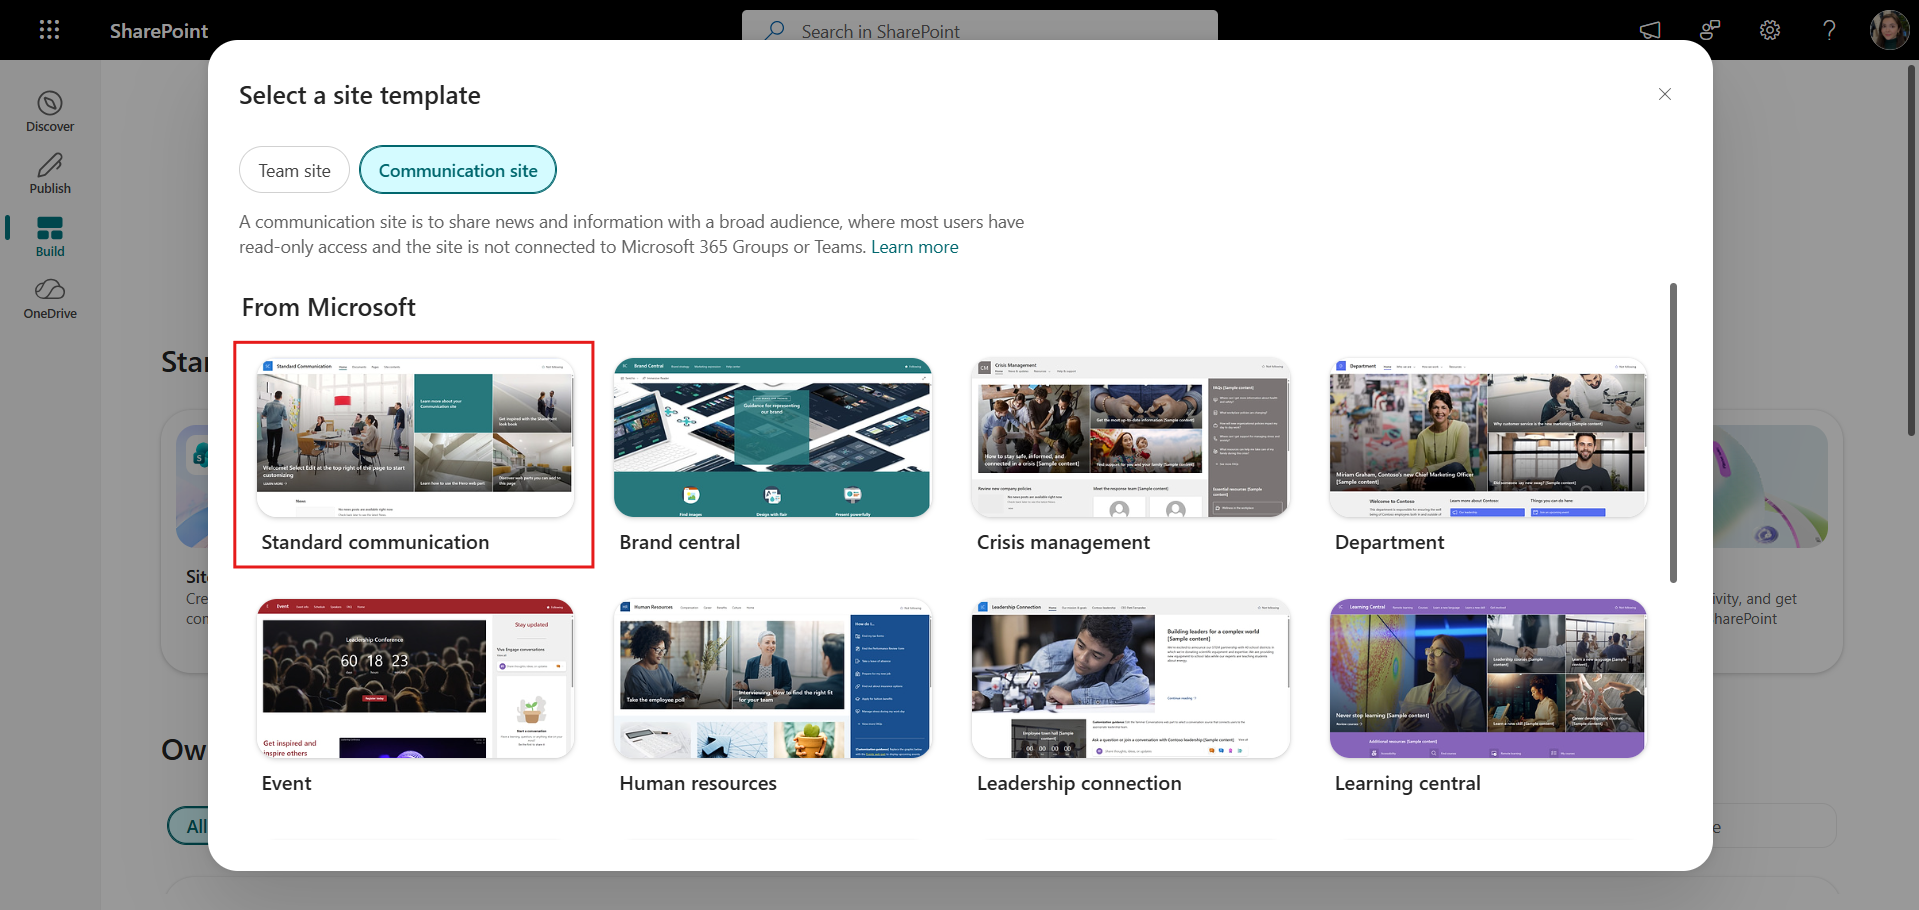
Choose the Standard communication template for your SharePoint intranet.
Next, choose Standard communication template, give your intranet a name, like The Hub, and add a simple site address, something like:
companyname.sharepoint.com/sites/intranet
Create your site and it will take you to your homepage, where you’ll be able to set your permissions, under “Site Access”.
Give “everyone except external users” Read access, so most employees can view the intranet. Give content authors Edit access, so they can update pages and news. And reserve Full Control access for your intranet administrators.
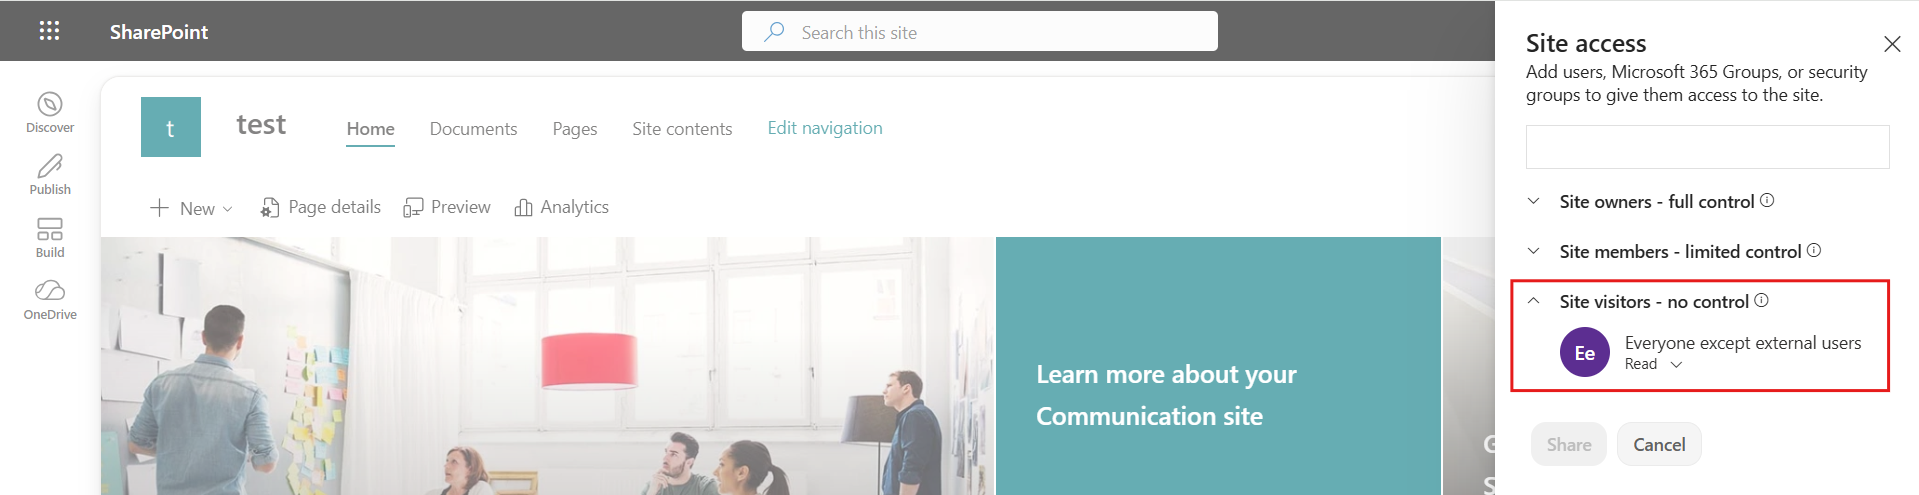
Configure site permissions so employees can access the intranet
Now the fun part: let's turn this site into an actual intranet!
Step 2: Build Your SharePoint Intranet Homepage
Here’s how you can create a SharePoint intranet homepage in just a few steps.
Clear the Default Homepage
Start by removing the elements from the default SharePoint homepage so we have a clean page to work with.
Add Sections & Backgrounds
Next, add a page section. Sections determine the layout of your page.
In this example, I’m using a Flexible section for the hero area, which gives me more freedom to position and resize the content.
Then, let’s add the background! For that, click Section Settings → Add Background → Choose an image.
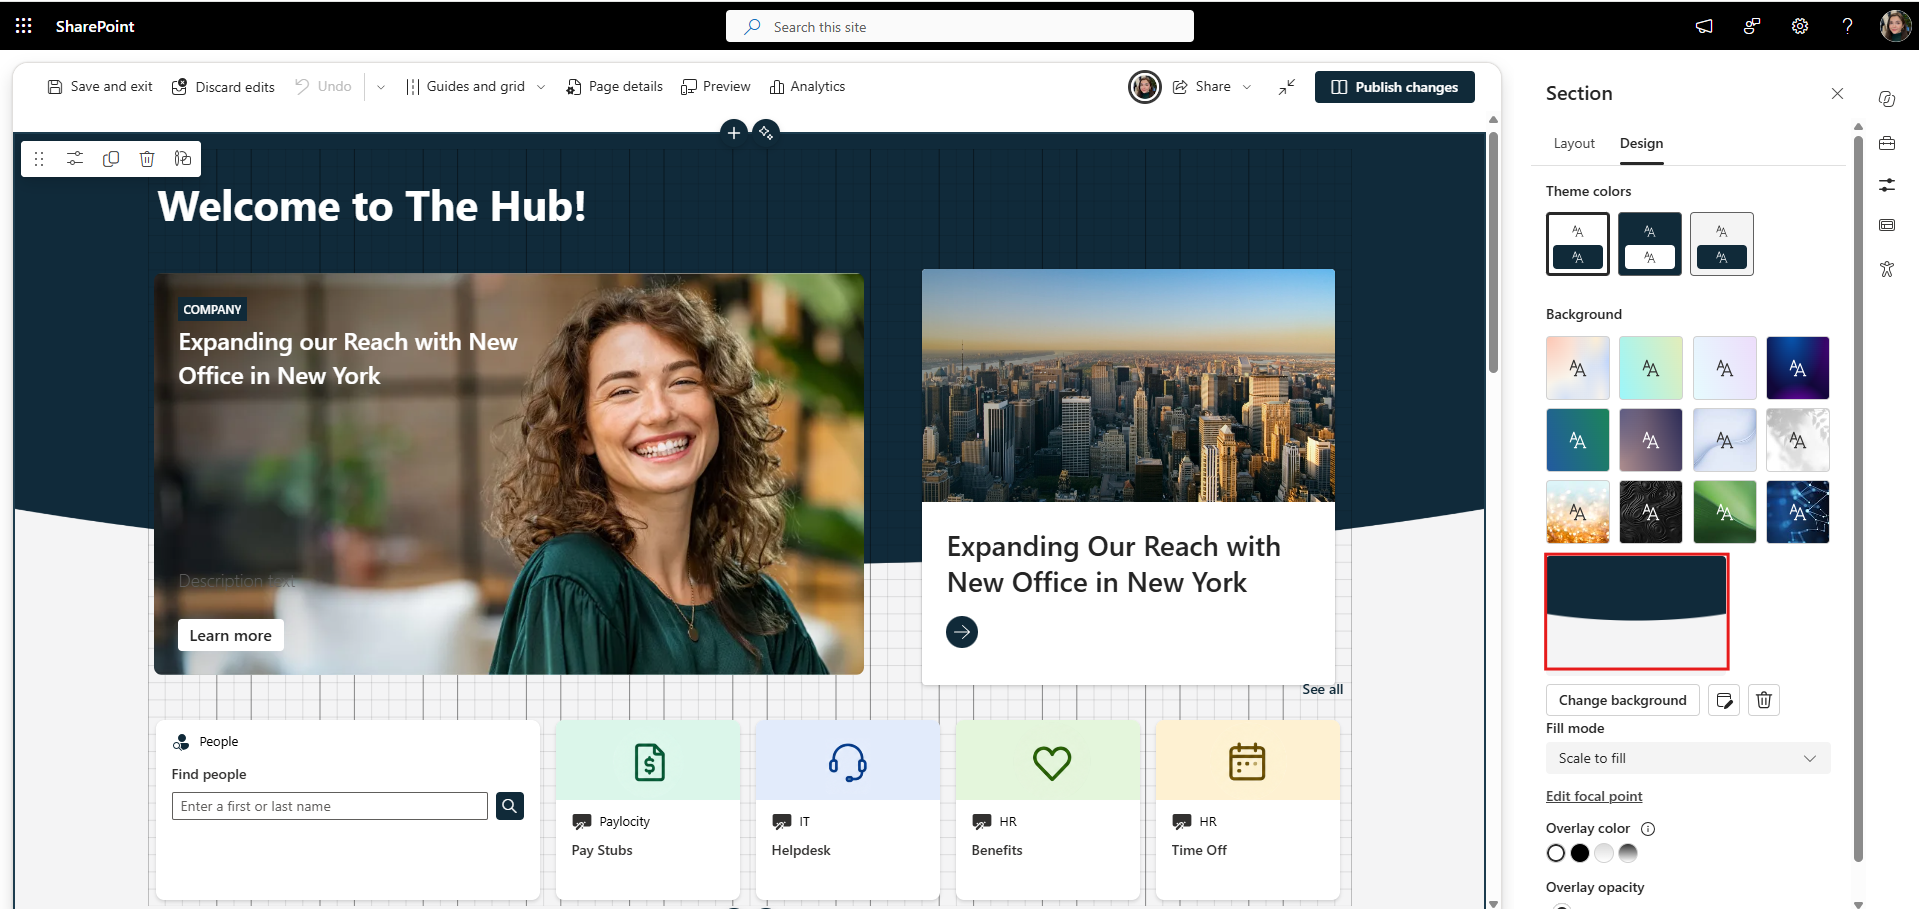
Customize your SharePoint intranet homepage with sections and background images.
Add Web Parts
Now we can start adding the web parts employees will actually use. Web parts are the building blocks of a SharePoint page. You use them to add things like news, links, events, images, text, and other content to your intranet
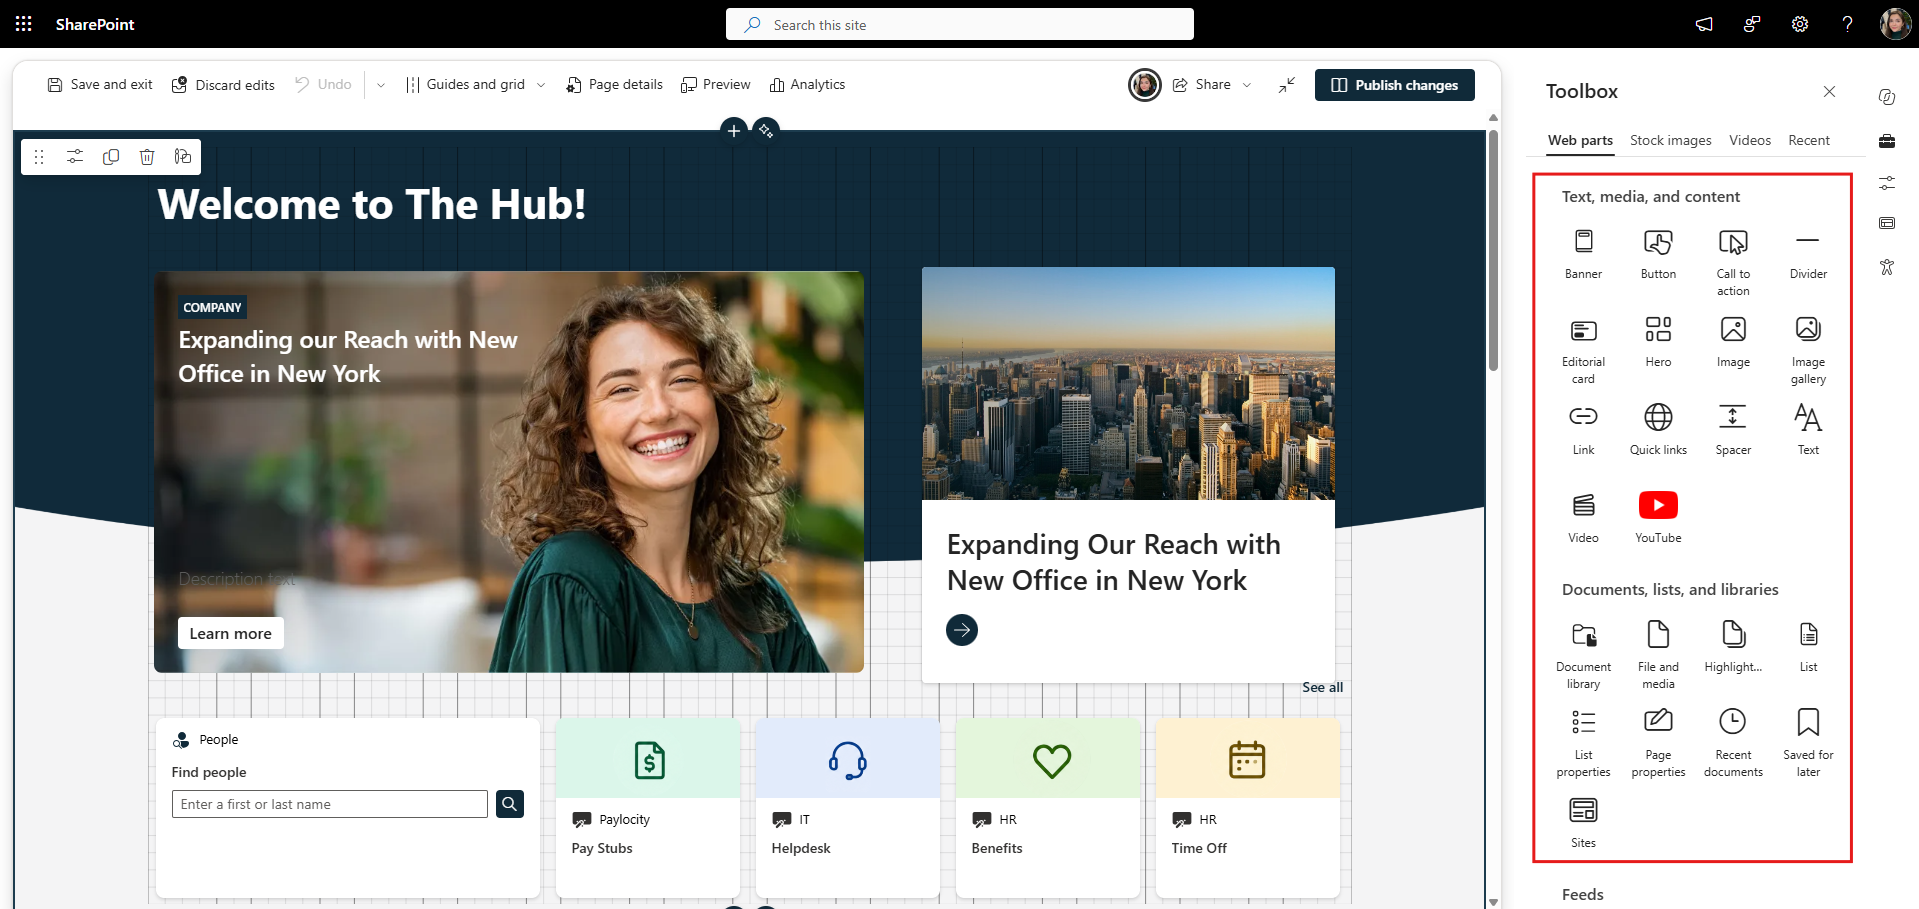
Add SharePoint web parts to build out your intranet homepage.
For our page:
Add a Hero carousel and Editorial Card to feature important company news.
Add a Dashboard for employee search and everyday resources like Pay Stubs and the IT Helpdesk.
Use Quick Links for fast access to things like Policies and Expense Reports, Add “Conversations” web part for kudos and quick polls and News for company-wide updates.
Finally, add an Events web part for upcoming company events like town halls and lunch & learns.
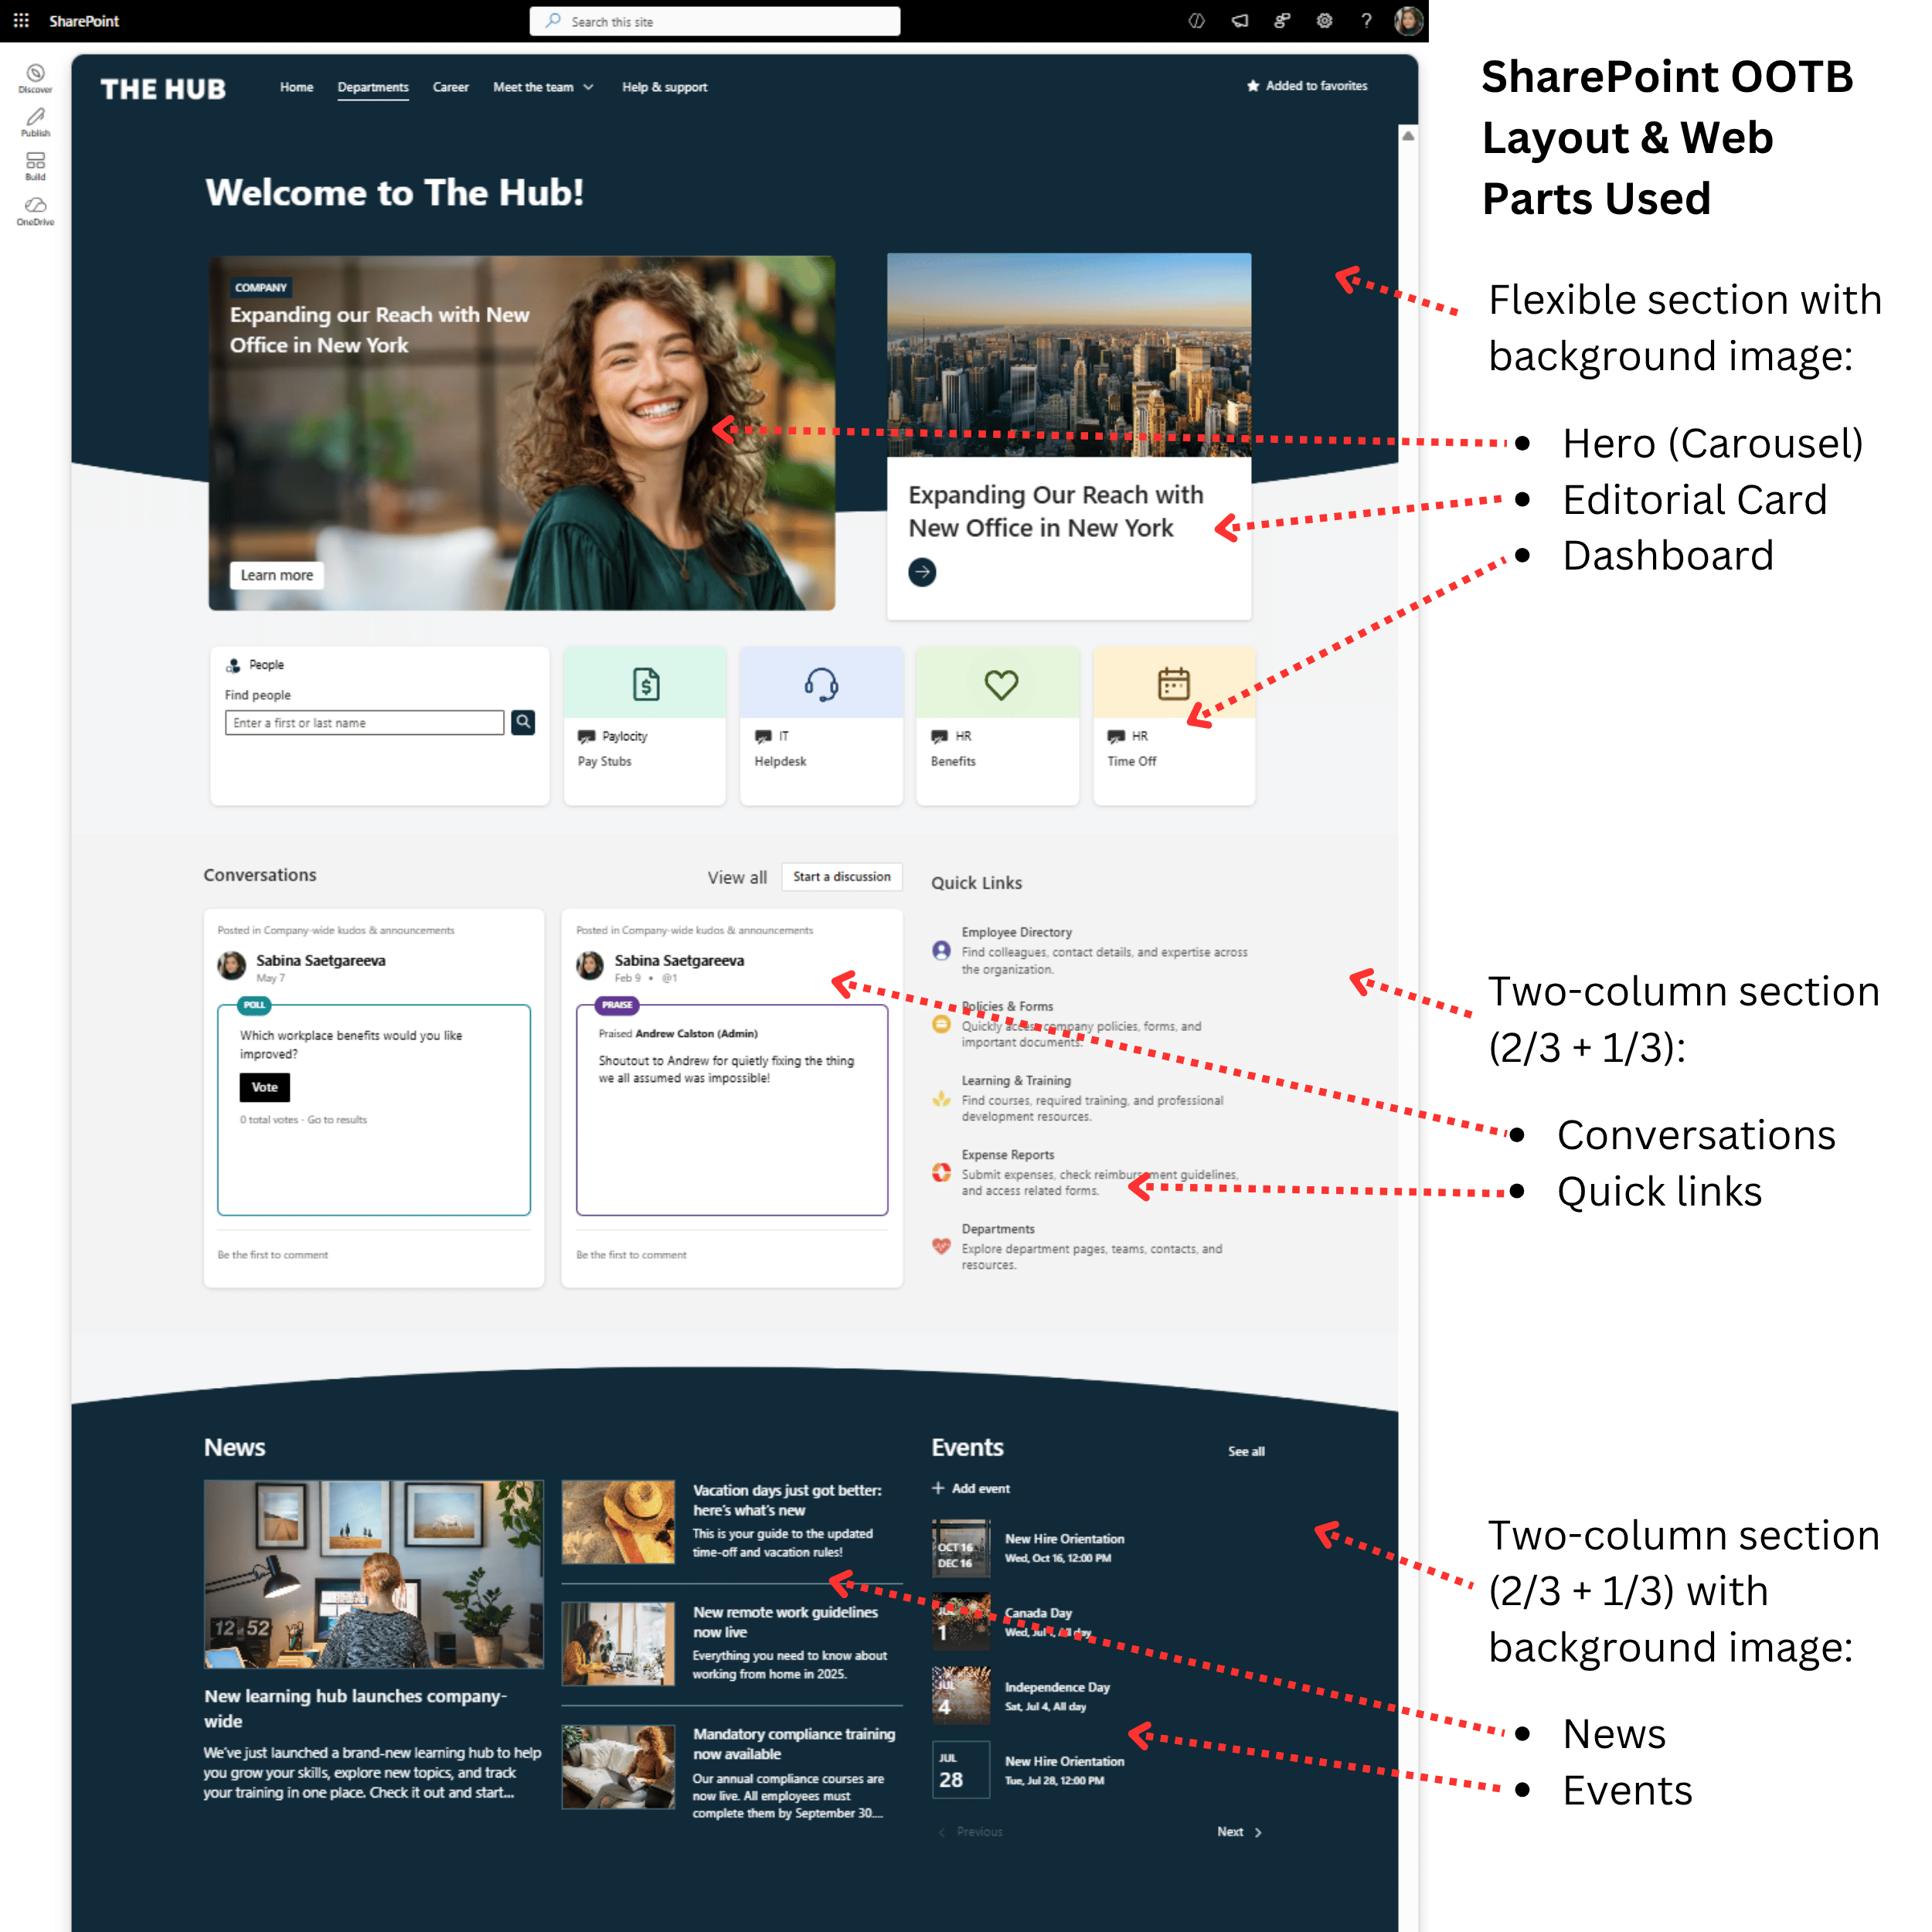
Example SharePoint intranet homepage built with out-of-the-box sections and web parts.
And your SharePoint intranet homepage is good to go!
Now we have a homepage that keeps employees informed while giving them fast access to the tools, information, and resources they use most.
Step 3: Set Up Your SharePoint Intranet Navigation
Now let's organize the rest of the intranet.
And here's a mistake that's really easy to make:
Don't just copy your org chart into your navigation.
Instead of organizing everything under department buckets like HR, IT, and Finance, think about what employees are actually trying to find or do.
For example, imagine someone needs information about parental leave.
They may not know to look under HR, Benefits or Payroll?
Instead, if you organize resources around functions, it can be more intuitive to find them.
For example, group benefits, pay, time off, and onboarding can go under Working Here; support under Get Help; and forms, applications, and guides under Tools & Resources.
You can still include Departments for employees who specifically want to visit HR, IT, Finance, or another department.
Here is the example of my navigation and what’s under each of the major buckets.
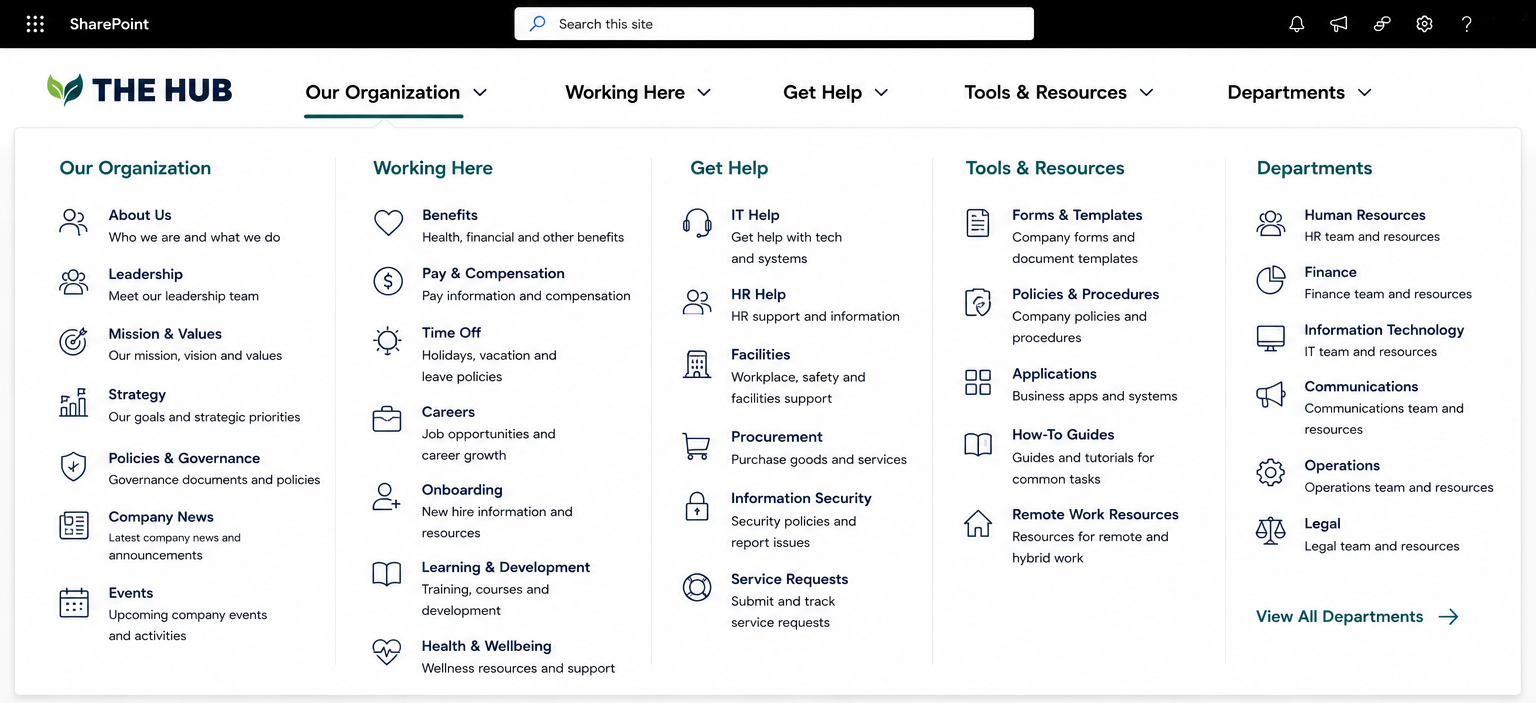
Example of SharePoint intranet navigation organized around what employees need to find and do.
Once you’ve decided on your navigation structure, click Edit navigation and start adding your menu items.
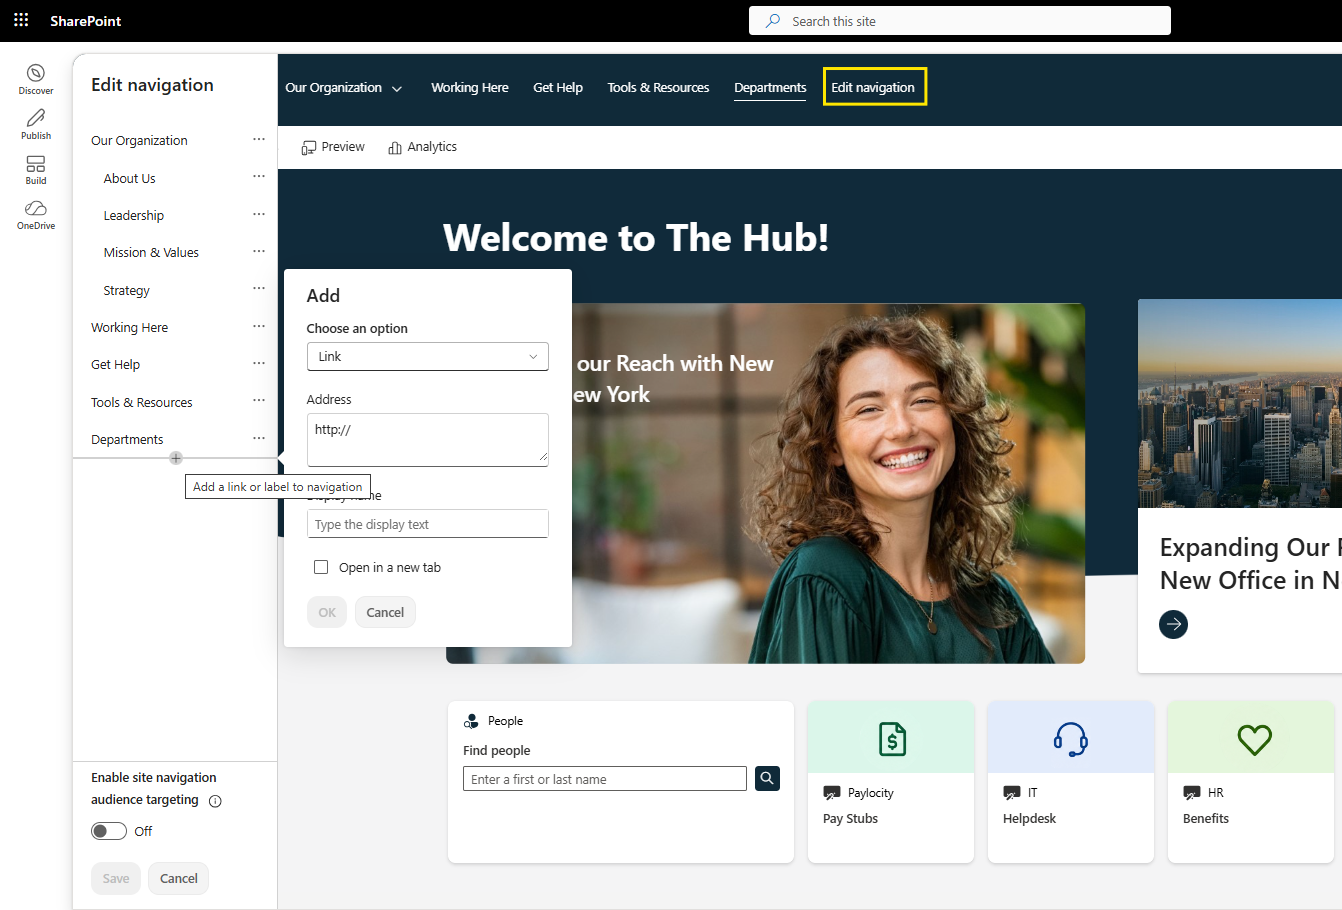
Use Edit navigation to add and organize your intranet menu items.
With the navigation in place, employees now have a clear path to the most important areas of your intranet.
Step 4: Select a Site Theme and Navigation Branding
Now that our top navigation is in place, let's make it match our company branding!
First, go to Settings → Site branding → New theme and add your company colors.
And this does more than just change your navigation colors.
Your theme determines the color combinations you can use across page sections and web parts like Quick Links, helping the whole intranet feel consistent.
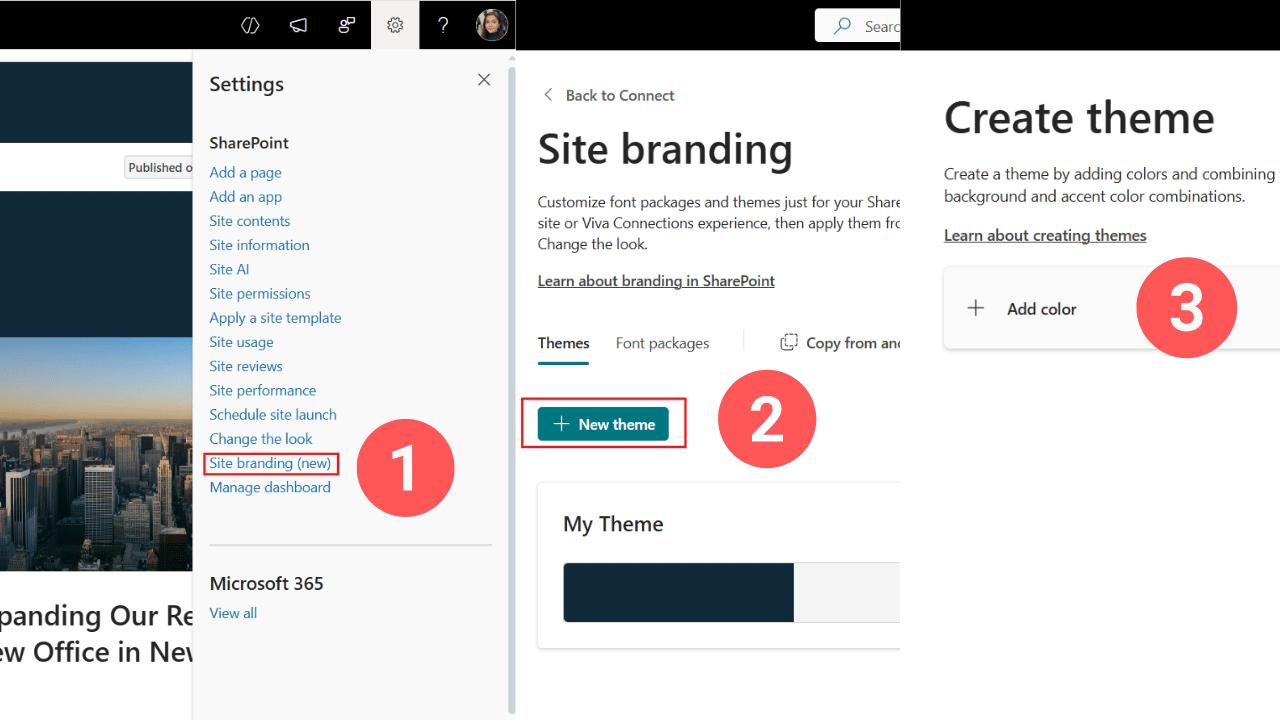
Create a SharePoint site theme using your company colors.
Next, go back to Settings → Change the look → Header.
Here you can choose your navigation layout, adjust the colors, and upload your company logo.
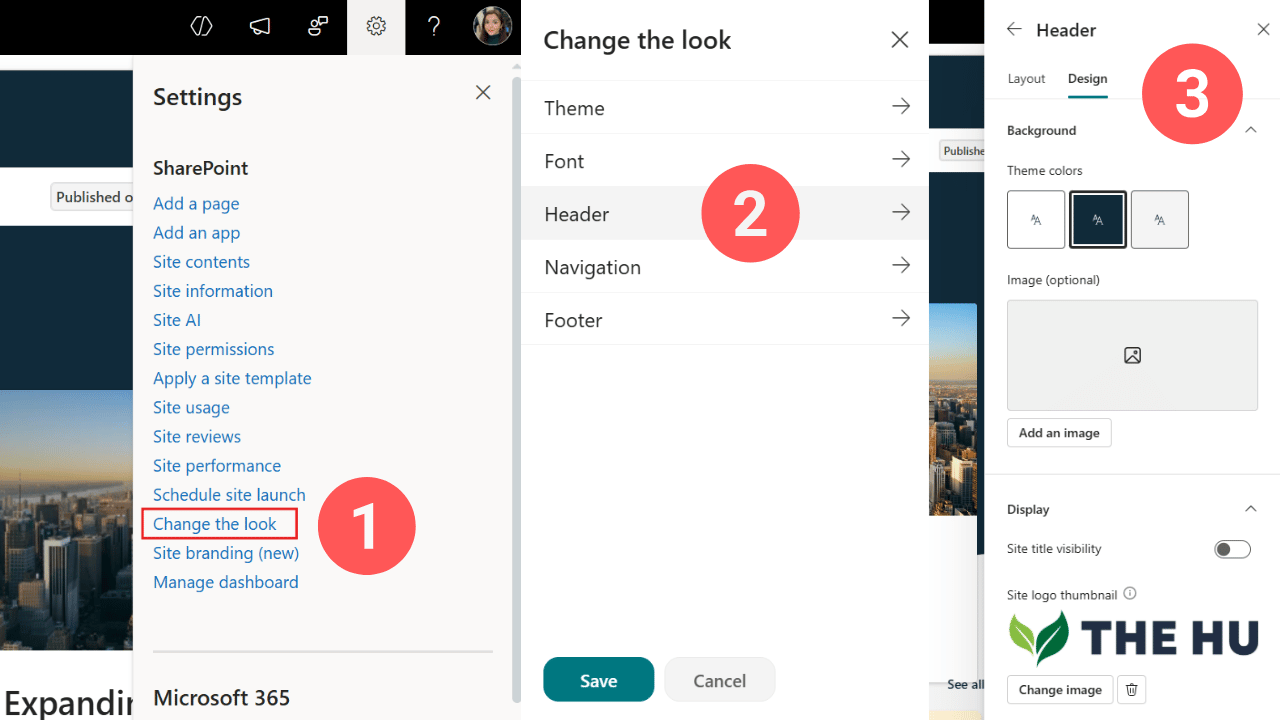
Customize your intranet header, navigation design, colors, and company logo.
A few quick changes and instead of looking like another default SharePoint site, your SharePoint intranet now matches your company branding.
Step 5: Add SharePoint News
To create news in SharePoint, go to your site, click New → News post, choose a template, click “use a template”, add your content, and hit Post news.
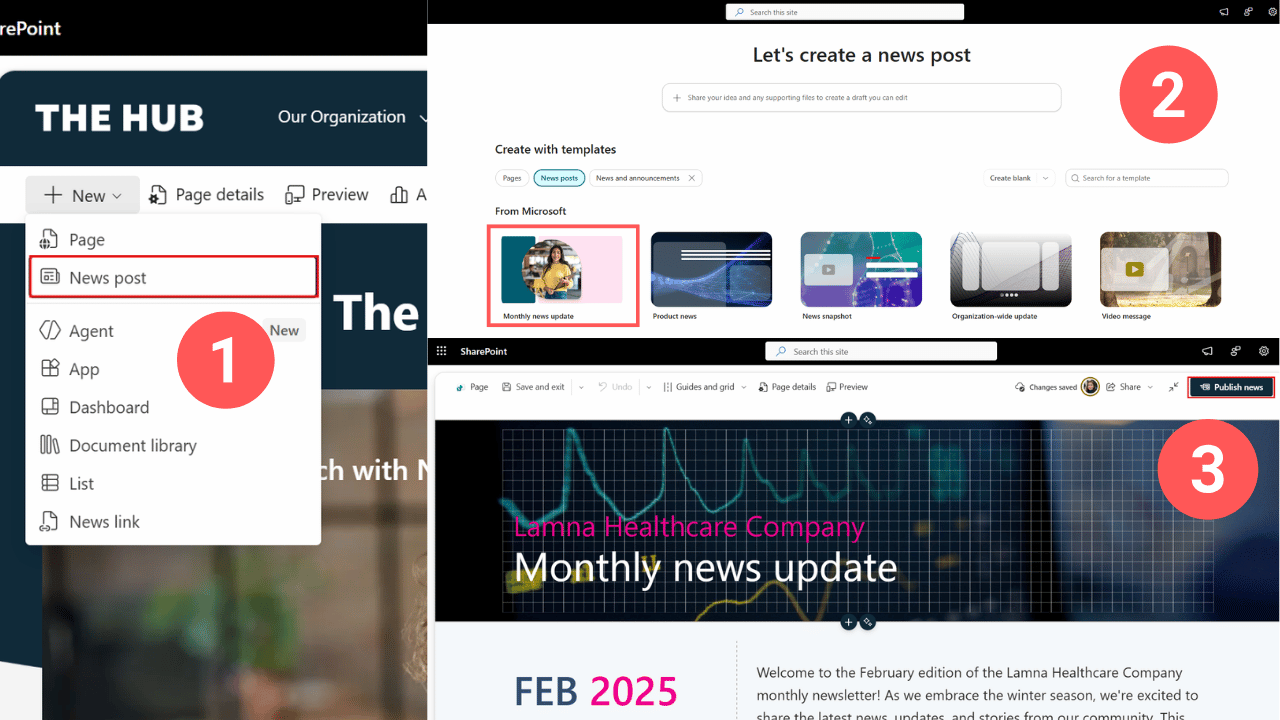
Create and publish company news using SharePoint News templates
Simple.
Where should you publish your news?
You don't need to publish everything from your main intranet. Company-wide news can live there, while HR publishes from the HR site and IT from the IT site.
That way, each department can manage its own news.
But then, how do you get all of that news onto one homepage?
If you go back to your SharePoint News web part, you can choose the sites you want to pull news from, and now employees can see updates from across your intranet in one place.
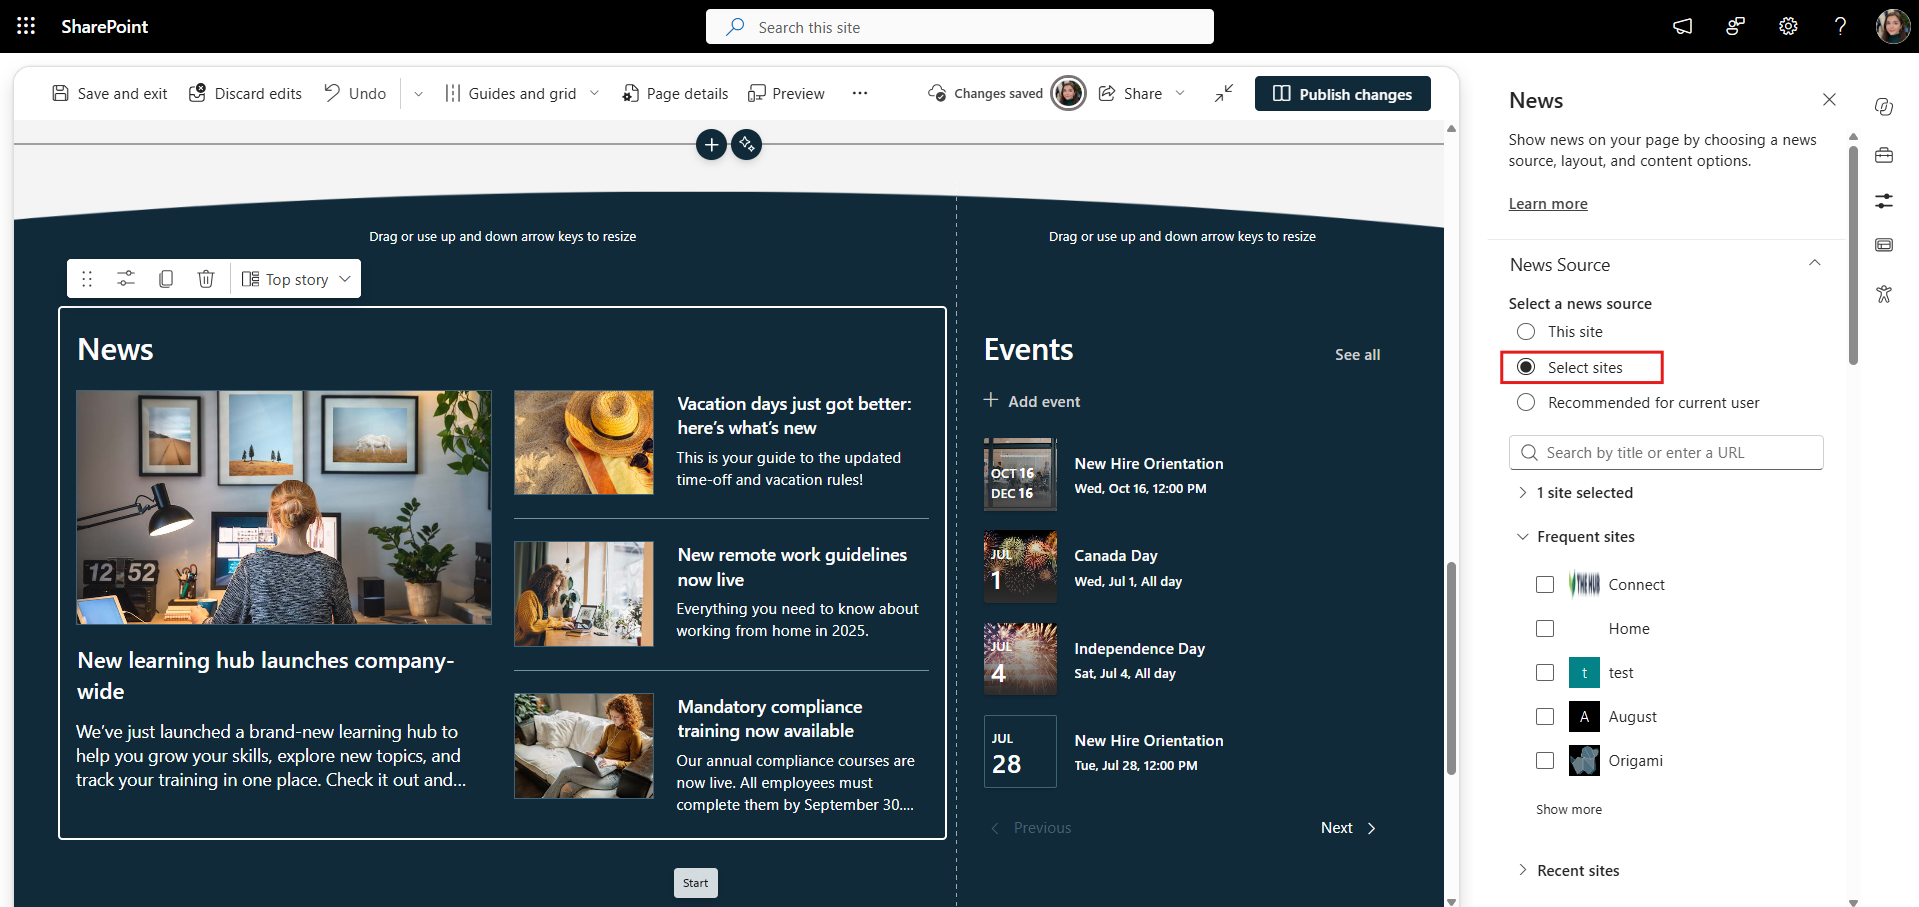
Bring news from department sites onto the main SharePoint intranet homepage.
And for really important news, don't just hope employees visit the homepage.
You can also send SharePoint news by email. Open your news post, select Share, then Send as email, add your recipients, and send it so the update lands directly in their inbox.
Step 6: Create Additional Intranet Pages and Sites
Should you build your entire SharePoint intranet in one site?
Probably not. But you also don't need a separate site for everything.
How Should You Structure a SharePoint Intranet?
Start with your main Communication Site. This is where your intranet homepage, company news, and company-wide resources can live.
As you add more content, you have two options: create additional pages within this site or create separate SharePoint sites.
For company-wide content, like Employee Resources, Company News, or an Employee Directory, you can simply create pages.
Let's create a page for our company-wide Forms & Templates.
Go to New → Page and start with a blank page.
On this page, I want employees to have one place to find frequently used company forms, document templates, checklists, and other downloadable resources.
So I’ll make that purpose clear right at the top with the page title and a short description underneath.
Where would the files live?
For that, go to Site Contents → New → Document Library and create a library for your forms and templates.
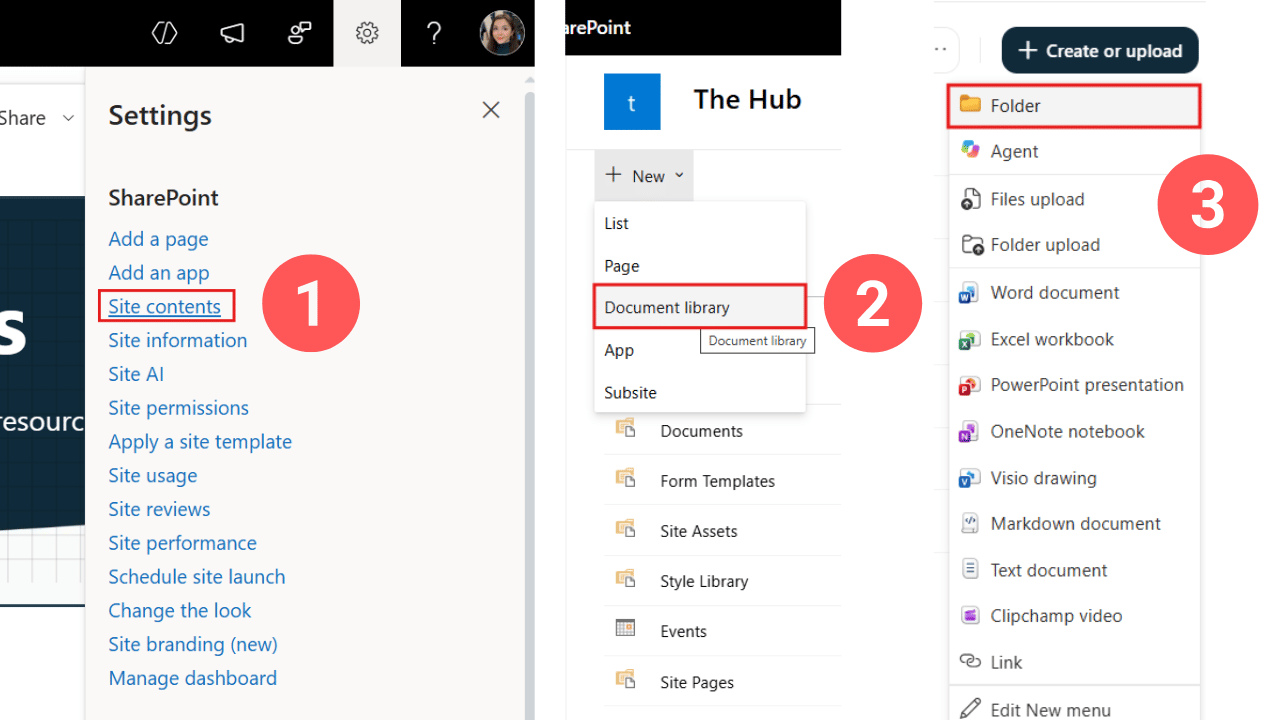
Create a SharePoint document library to store and manage intranet forms and templates.
Keep the folder structure simple, ideally no more than two levels deep. Anything deeper can quickly become difficult to navigate and maintain.
And your intranet team doesn't have to maintain every file themselves. Give HR, Finance, and other teams permission to maintain the forms and templates they own, without giving them control of the entire intranet.
Here’s what your folder structure could look like.
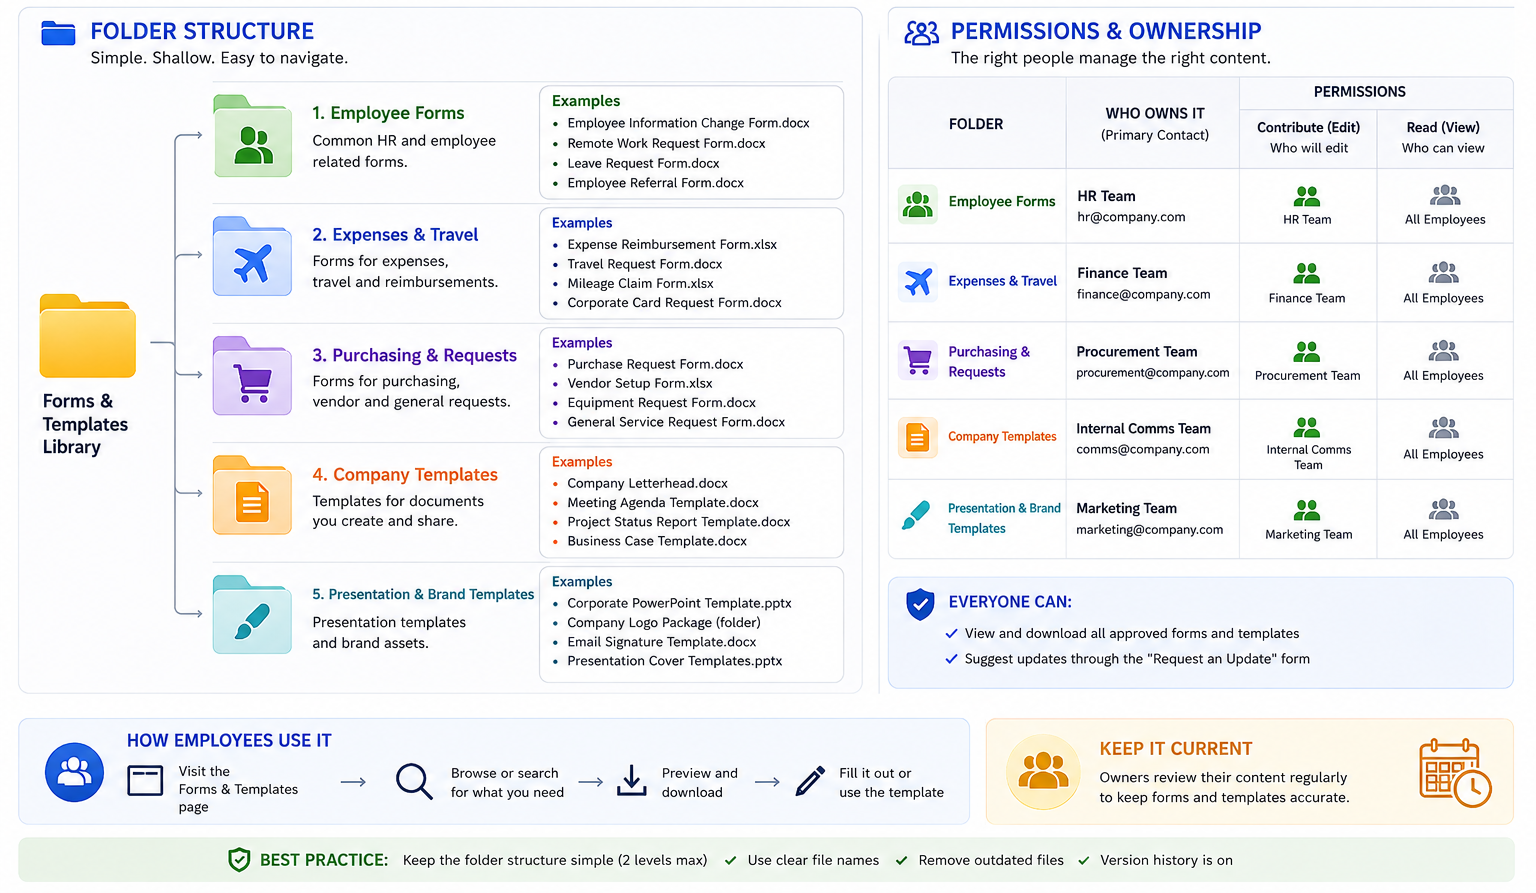
Example folder structure and ownership model for managing shared intranet documents.
Now upload your files, then go back to the page and use the Document Library web part to surface them in a way that's easier for employees to browse.
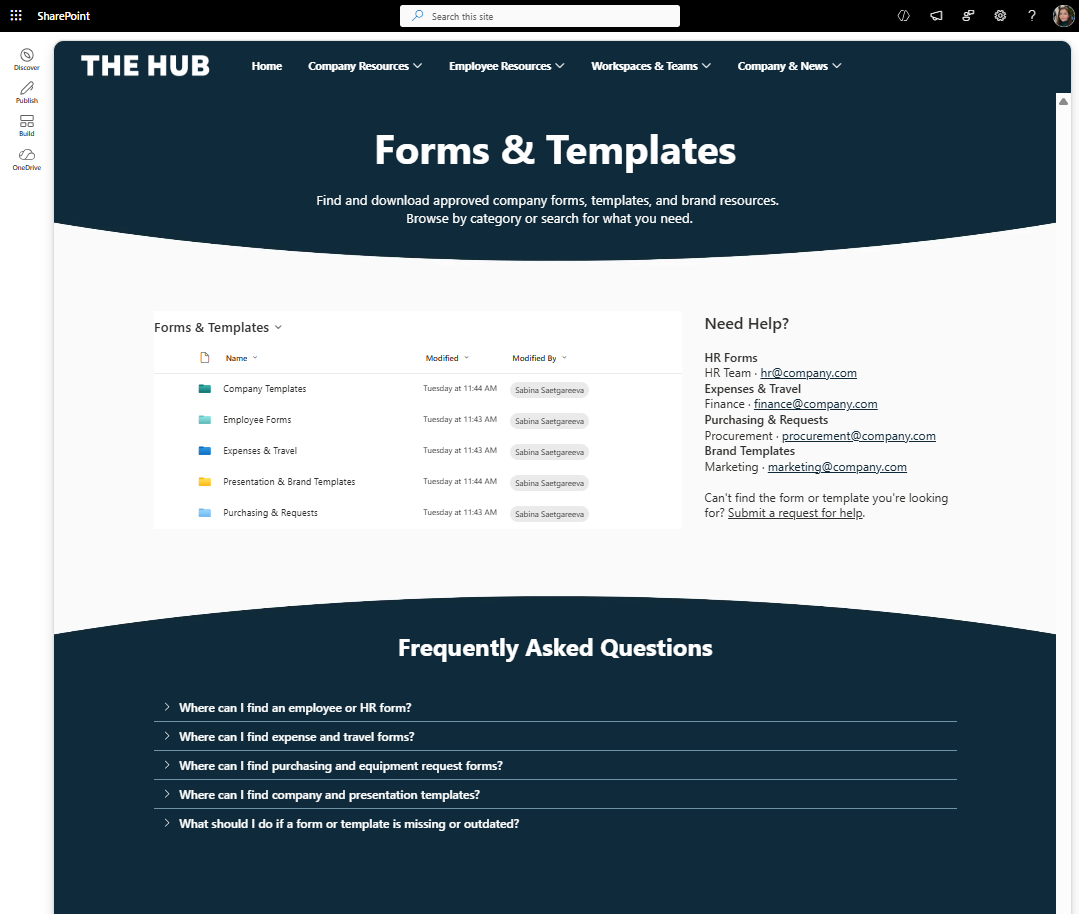
Example of a company-wide Forms & Templates page built in SharePoint.
So the document library stores and manages the files, while the page gives employees an easier way to find and access them.
Once you're happy with the page design, name the page and save it as a template. Now you can reuse that layout when creating other company-wide resource pages.
But not everything should become another page on your main intranet.
As your intranet grows, areas like HR, IT, or Learning may need their own SharePoint sites.
Ask yourself two questions:
Does this area need its own content owners or permissions? And is it big enough to become its own destination?
For example, HR might have benefits, onboarding, policies, forms, and its own news—all managed by HR.
That's a good candidate for a separate site.
The same could apply to IT or a larger Learning portal.
Create those as separate Communication Sites, give each team ownership of their site, and build a department homepage design you can reuse.
Here is an example of what your department page can look like OOTB:
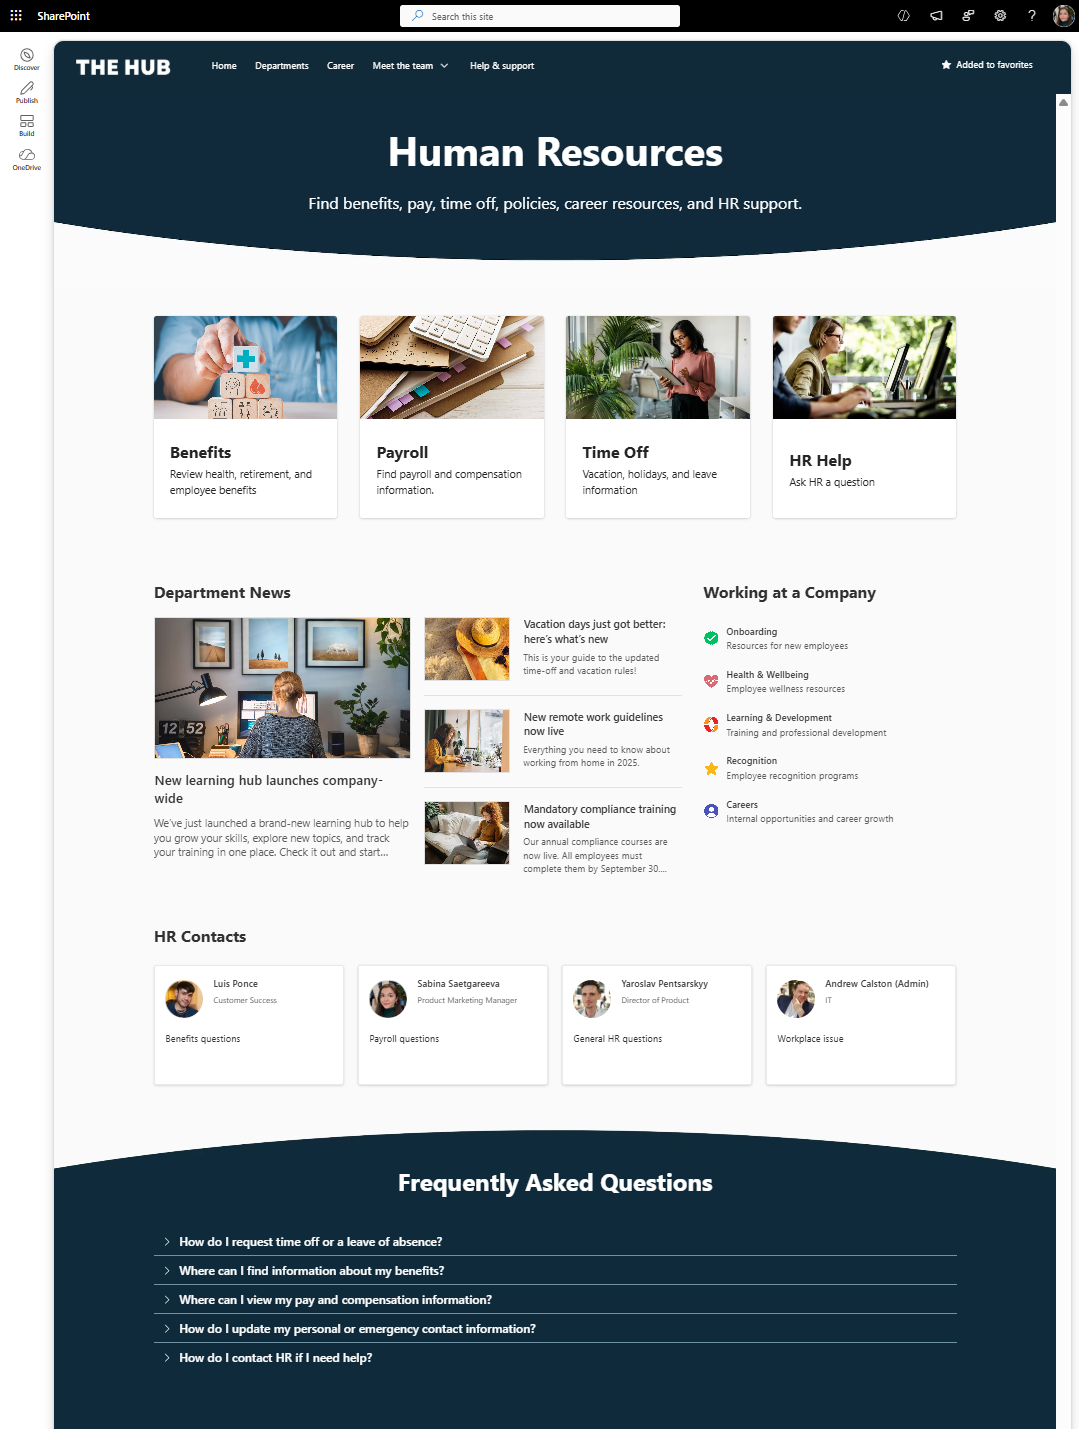
An out-of-the-box SharePoint HR page for employee resources and department content.
Once all your pages and sites are created, your intranet site structure will look like in this example.
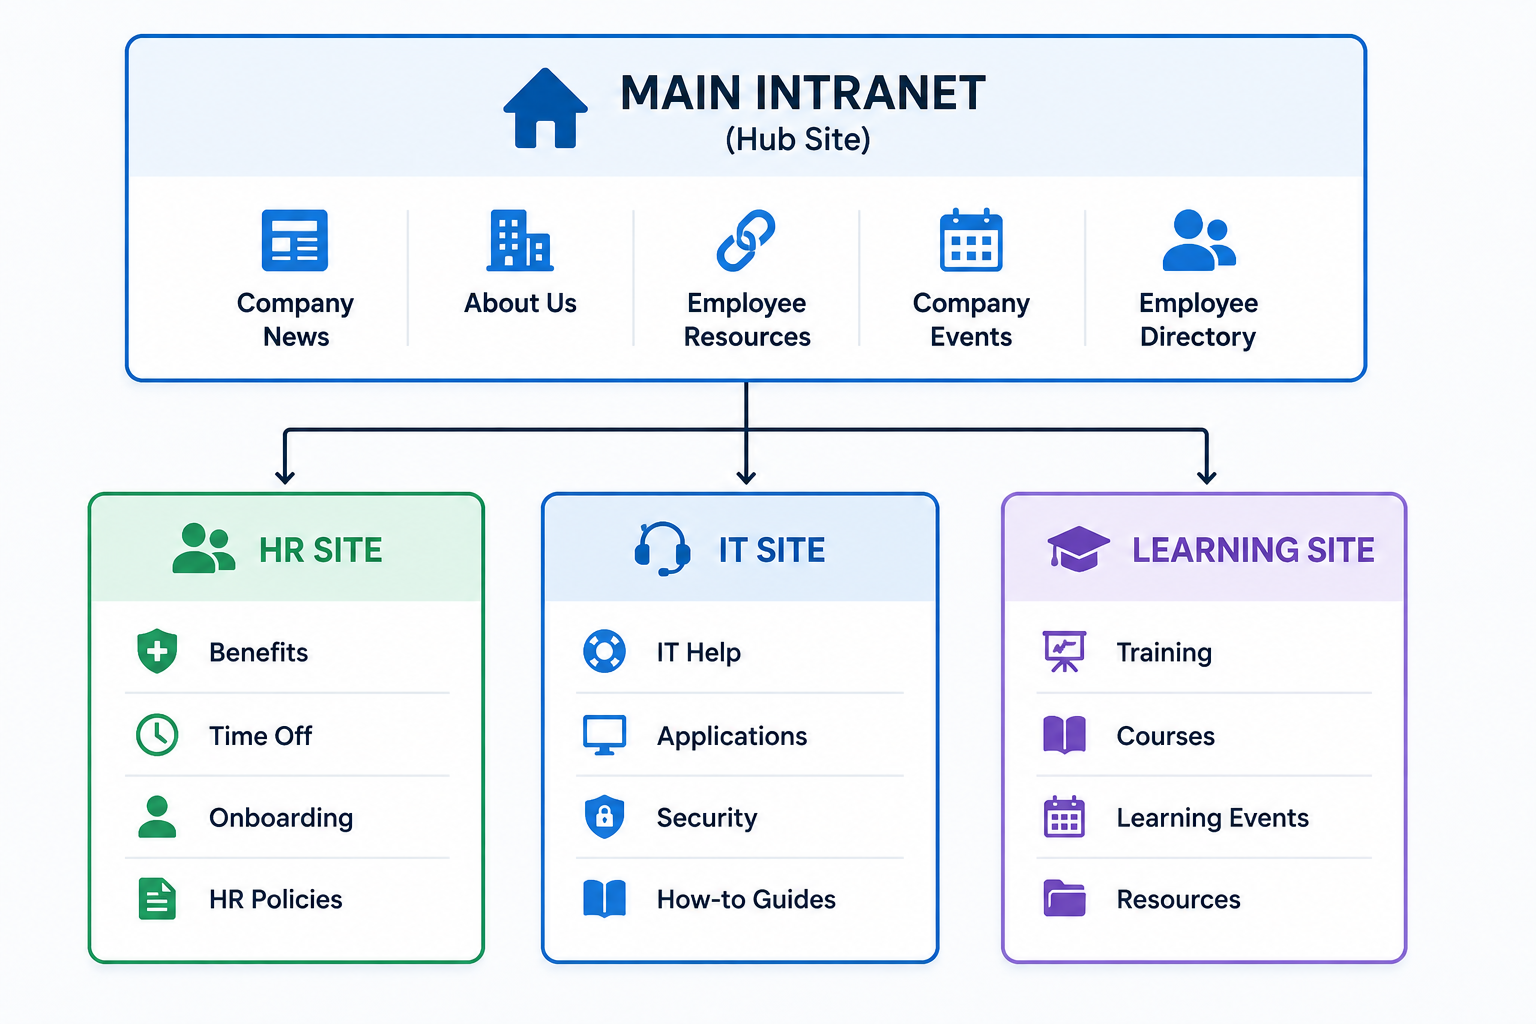
Example SharePoint intranet structure with a main site and separate department sites.
Out of the box, you can connect these sites with a SharePoint Hub Site, so they share navigation and feel like part of the same intranet.
But as your intranet grows, content gets spread across sites—HR owns policies, IT owns technology resources, and Learning owns training.
Content becomes siloed within teams and employees have to dig through sites to find anything.
This is where I want to give a quick plug for Origami.
With Origami users can see documents, news, events, and search all on the same page like a one stop shop, while that content can continue living on department sites where owners manage it.
You can also create shared navigation without tying every site to the same Hub Site, giving you more flexibility behind the scenes.
So departments manage their own content, while employees get one connected intranet experience.
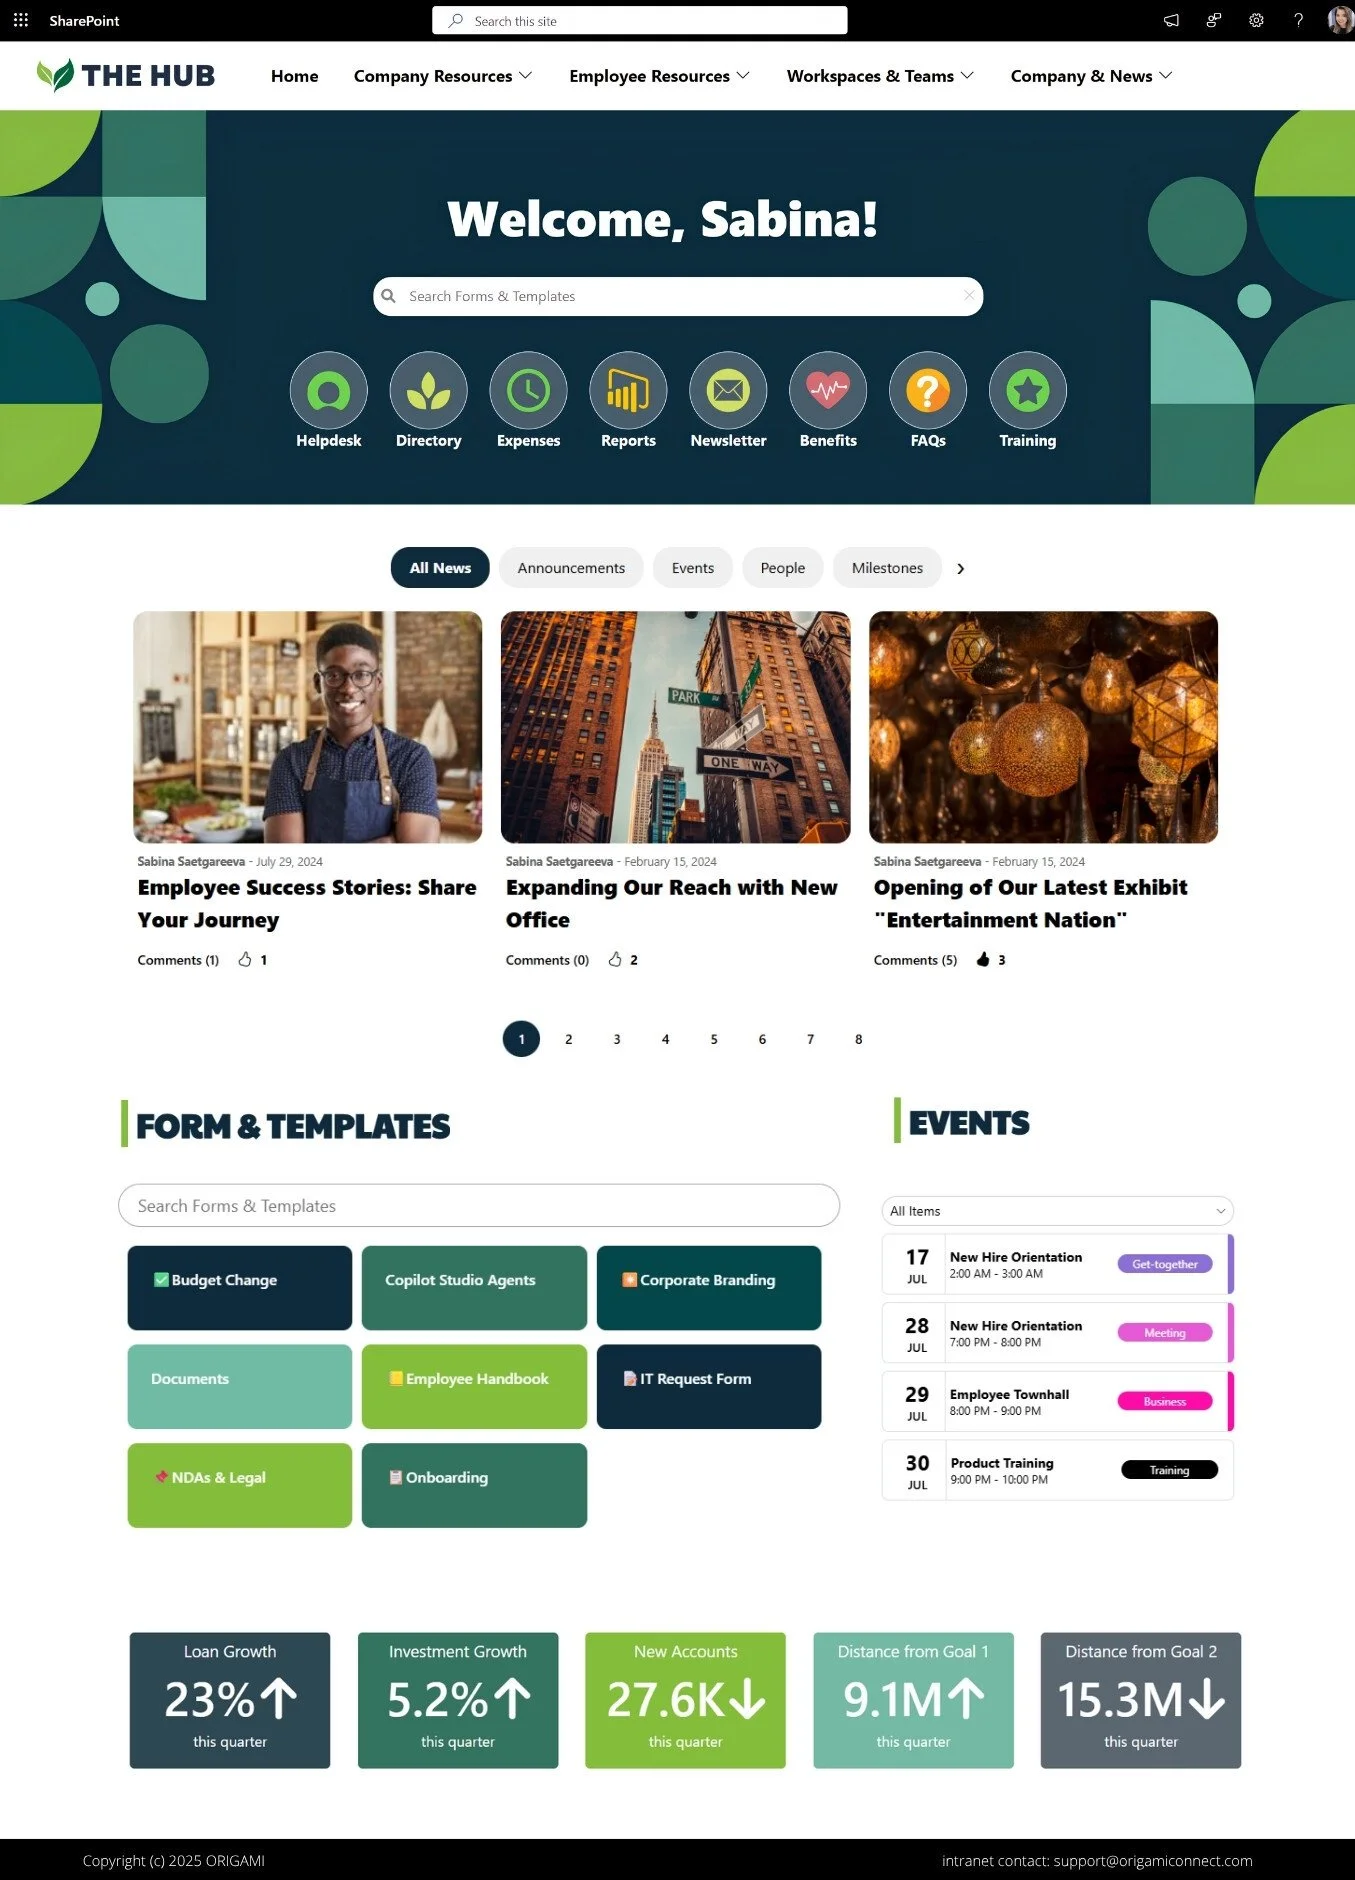
Example of a SharePoint intranet extended with Origami web parts
Step 7: Test, Launch, and Maintain Your SharePoint Intranet
Before launching, give the intranet to a few employees who didn't build it.
Instead of asking “Do you like it?”, give them real tasks:
Find the parental leave policy.
Submit an expense.
Contact IT Support.
Find your benefits information.
Then watch where they struggle.
If several employees look in the wrong place, don't assume they'll eventually figure it out. Fix the intranet.
Also test links, permissions, and the mobile experience before launch.
When you're ready, introduce the intranet through channels employees already use, such as Teams, email, company meetings, and onboarding.
For more ways to get employees using your new intranet, see our our intranet launch ideas for improving adoption.
But don't just announce “Our new intranet is live.”
Show employees what they can now do faster:
Find policies. Access Payroll. Submit expenses. Get IT help. Catch up on company news.
And keep improving after launch. Watch what employees use, what they search for, and what they still can't find.
Launch may be the end of the intranet project. But you need to allocate time for maintenance and updates based on usage.
What Can You Build with Out-of-the-Box SharePoint?
At this point, we've built a complete intranet using 100% out-of-the-box SharePoint.
We've got a branded homepage, navigation, quick links, news, events, employee resources, and permissions.
And for many organizations, this may be enough. Here’s another example of what you can build in SharePoint.
SharePoint handles the intranet fundamentals really well.
Now, what about Copilot and SharePoint agents?
Microsoft is adding AI features that can help employees find and interact with information. But because these depend on your Microsoft 365 licensing and setup, we're not covering them here.
Everything we've built works without Copilot or agents and any associated licenses.
So where does out-of-the-box SharePoint start to fall short?
Usually when you want more design flexibility, personalization, or functionality beyond the standard web parts.
And that's when the question changes from:
“Can SharePoint build an intranet?”
to:
“Can out-of-the-box SharePoint build the intranet experience we actually want?”
When Is Out-of-the-Box SharePoint Not Enough?
Imagine your intranet has been live for a while, employees are using it, and new requests start coming in:
“Can employees personalize their links?”
“Can we make SharePoint search better?”
“Can we make the employee directory and news easier to search?”
“Can we make the homepage feel more like a modern website?”
This is often the point where organizations start looking beyond out-of-the-box SharePoint.
You may want more flexible design and navigation, personalized bookmarks, a more powerful employee directory and search experience, news with category filtering, employee anniversaries and new-hire celebrations, mandatory-read tracking, a LinkedIn feed, or other features that aren't available natively in the way you need them.
At this point, you can custom-build these experiences or use a SharePoint intranet solution like Origami.
Origami extends your existing SharePoint intranet with ready-made web parts and templates, so you can add these capabilities without replacing SharePoint or building everything from scratch.
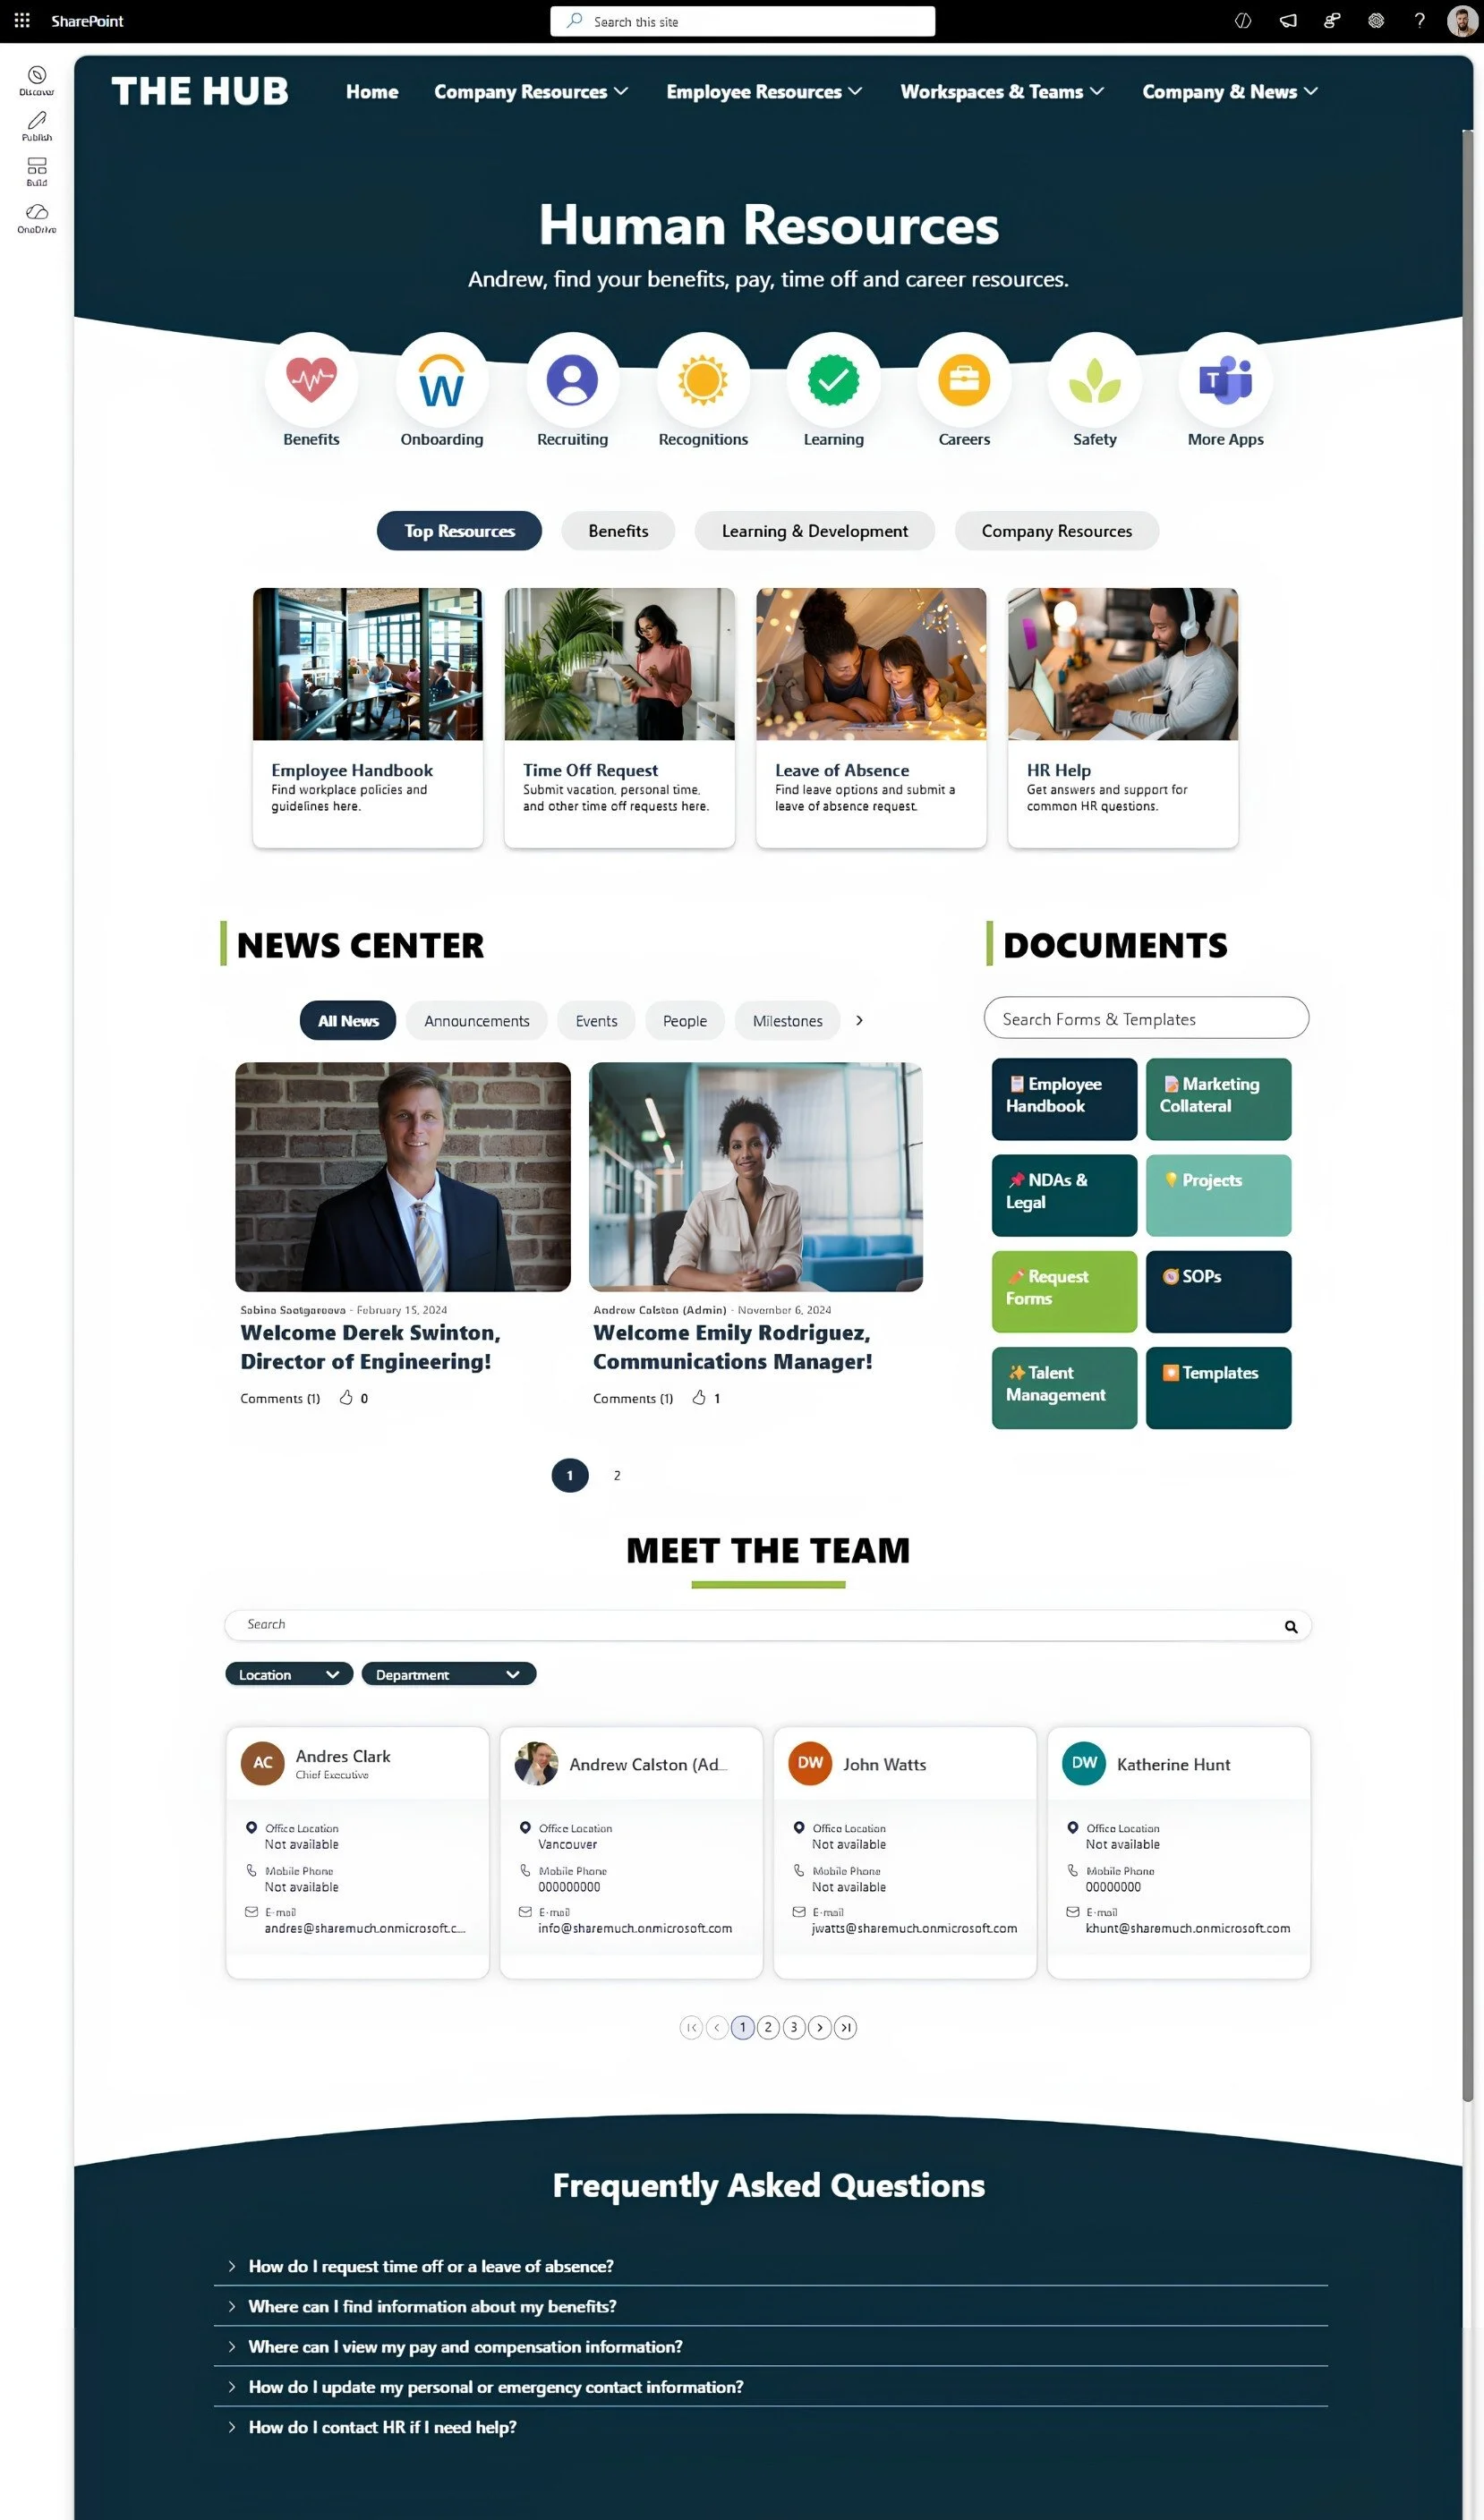
Example of a SharePoint intranet landing page enhanced with Origami web parts and navigation
SharePoint OOTB vs. SharePoint Origami plugin
This is how our SharePoint HR department page looked before and after we upgraded it with Origami.
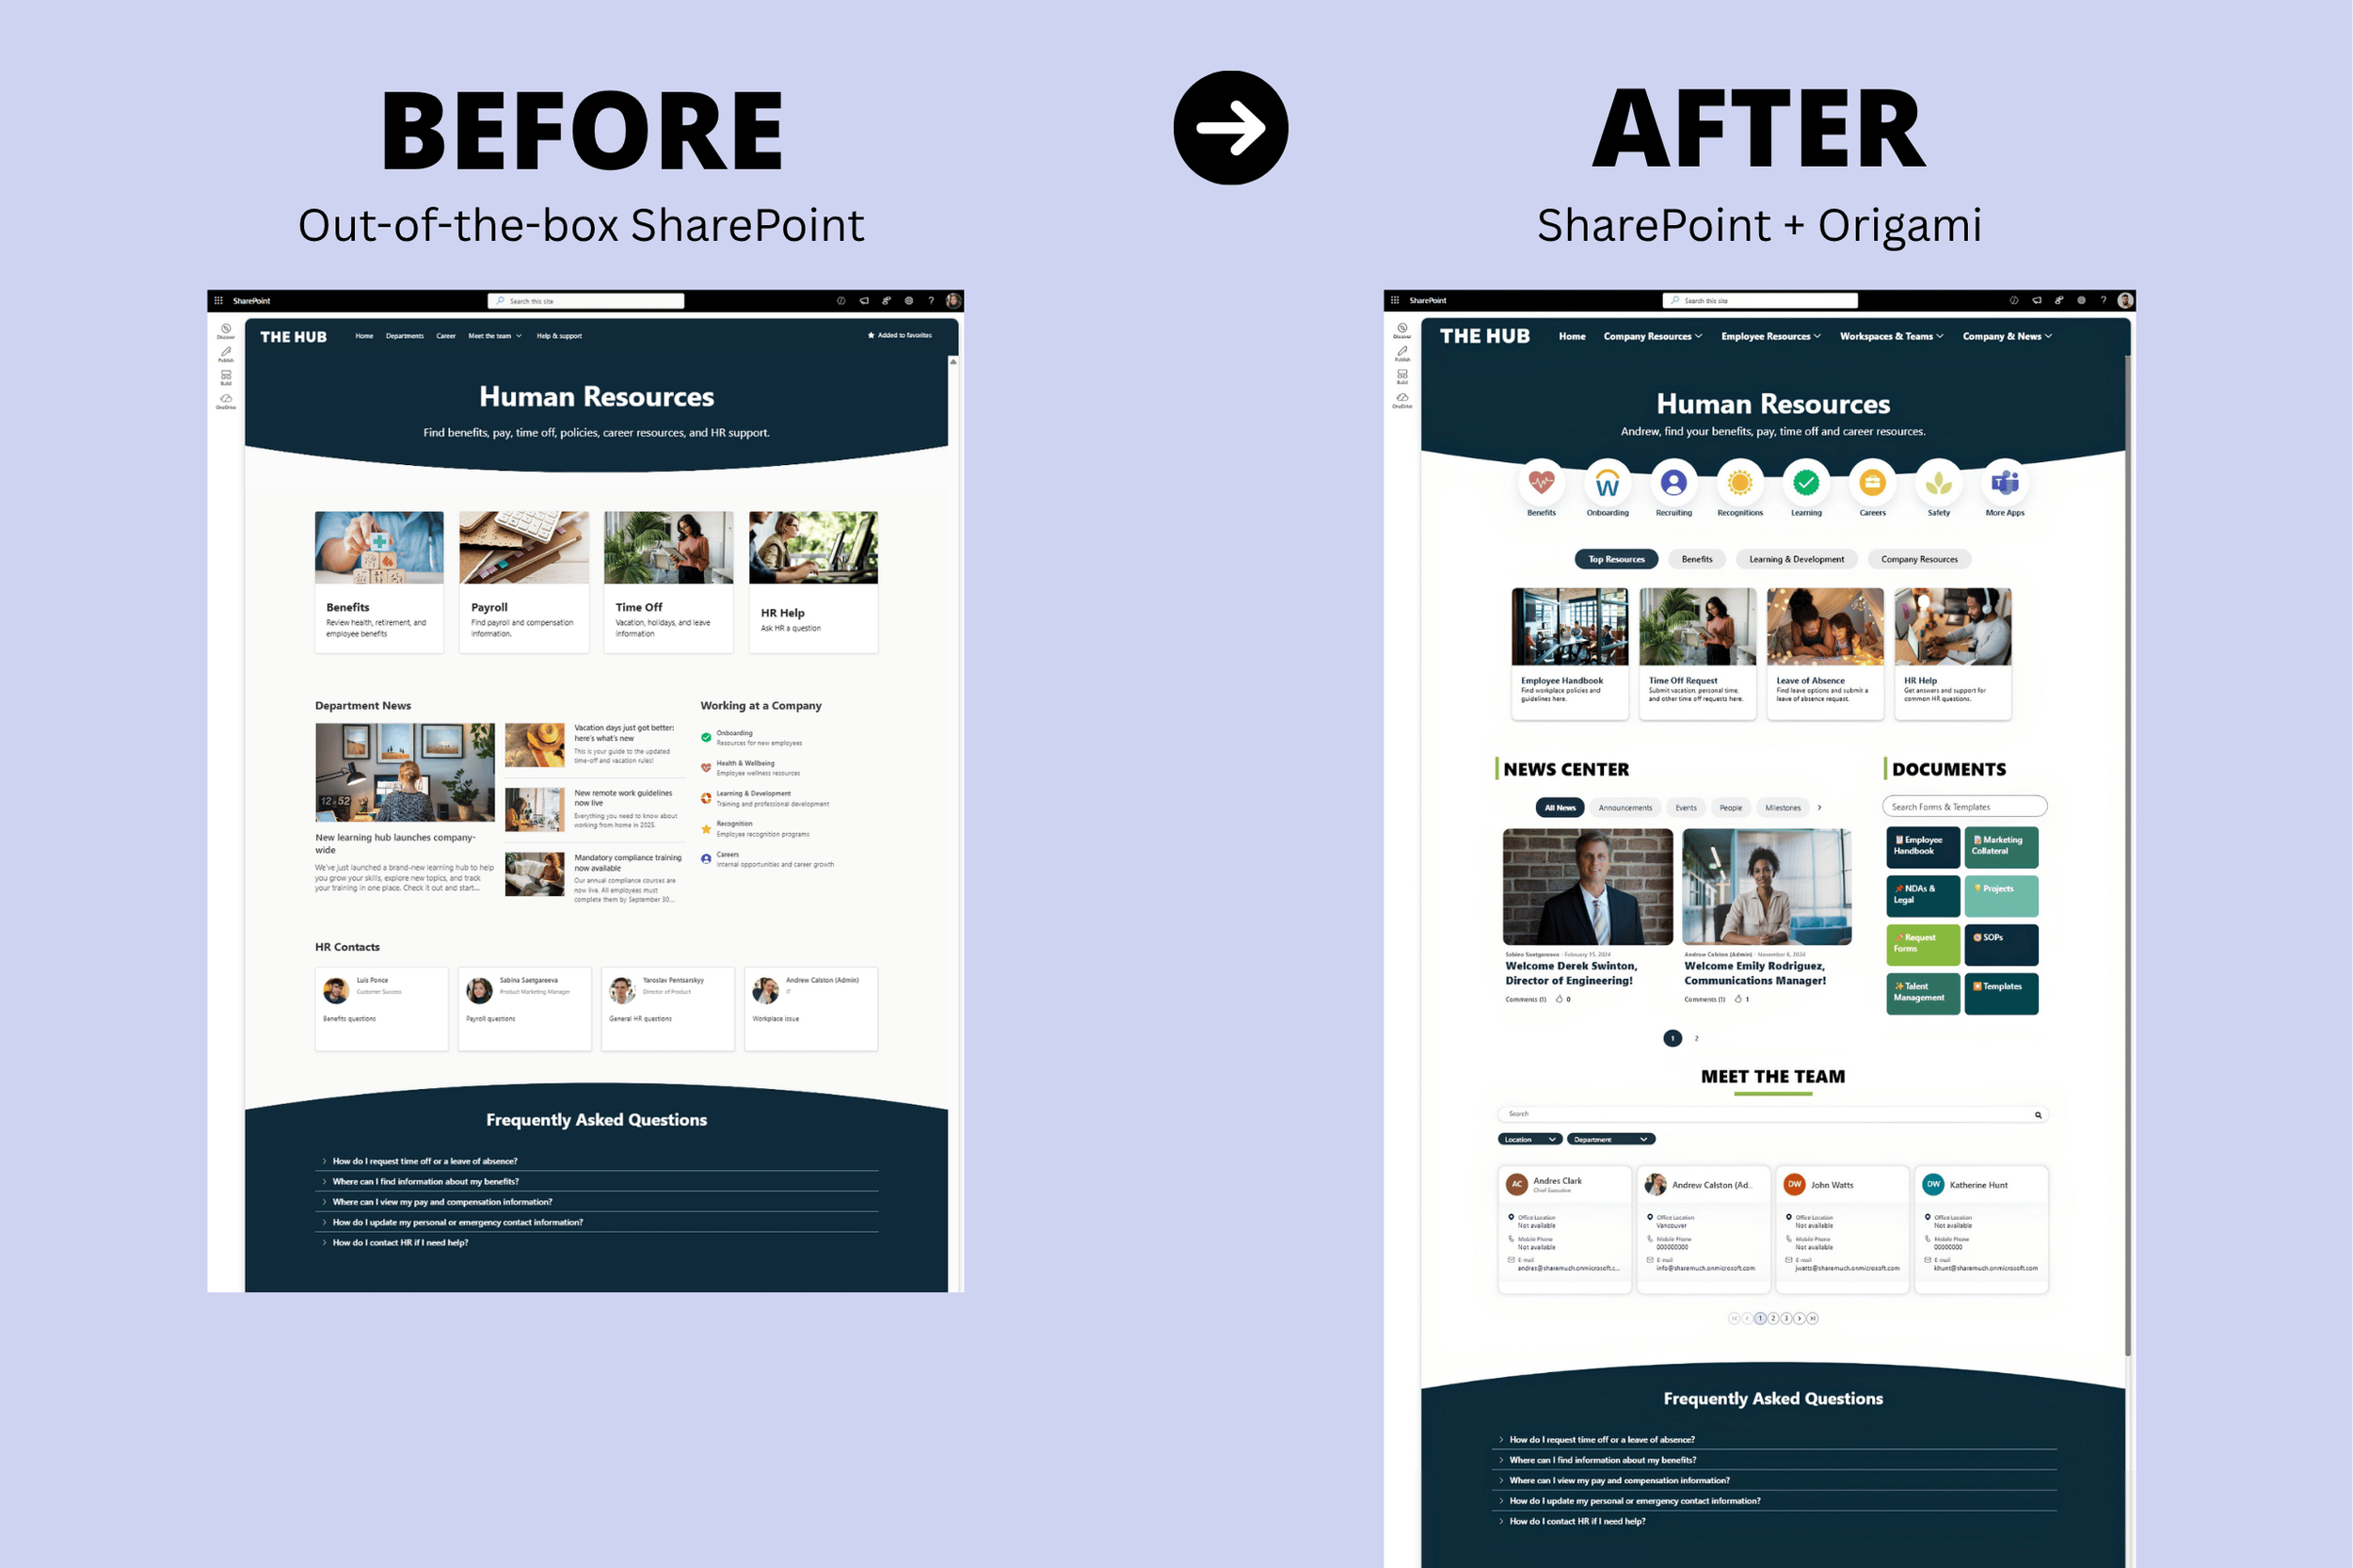
Before and after: an out-of-the-box SharePoint HR intranet compared with the same page enhanced with Origami web parts.
Both are SharePoint.
Origami option gives you more flexibility around design, navigation, personalization, and intranet-specific functionality.
If OOTB SharePoint meets your requirements, use it. If you're repeatedly working around its limitations, extending SharePoint may make more sense than building everything yourself.
Explore our SharePoint Site Templates to see what's possible with Origami SharePoint plugin.
SharePoint Intranet Design Best Practices
If you remember only a few things from this tutorial, make them these:
Make common tasks easy to reach. Put frequently used applications, forms, templates, and resources where employees can find them quickly.
Organize around function, not departments. Employees shouldn't need to know whether HR, Finance, or IT owns something to find it.
Don't recreate your org chart. Organize resources in ways employees understand.
Give content an owner. Someone should be responsible for keeping every major area current.
Start small. A focused intranet employees actually use is better than dozens of sites nobody maintains.
For more, see our 20 SharePoint Design Tips.
Start Building Your SharePoint Intranet
Remember where we started: a blank SharePoint site.
You don't need to build your entire future intranet before launching.
Start with the information and resources employees need most, clear navigation, current news, and a few pages that solve real everyday needs.
Then put it in front of employees.
Watch what they use. See what they can't find. Build the next version around what you learn.
Your intranet doesn't need to be enormous.
It needs to make work easier.
Build Your SharePoint Intranet Faster with Origami
If you want to go beyond out-of-the-box SharePoint, explore ready-made intranet templates and 40+ web parts for navigation, news, search, employee resources, personalization, and more.

Sabina Saetgareeva is a Digital Marketing Specialist at ORIGAMI. She helps infuse ORIGAMI brand with what customers need and seek. Sabina is an avid reader of the future of work, digital transformation, and trends in Digital Employee Experience.